
Focus stacking; is there a best way?
I found it surprisingly hard to do.
First an unstacked or normal version:
Helicon Filter automatic focus stacking with two images. I actually found the tiniest movement of the focus ring threw everything out, I even had to use live view and it is still not to my liking:
Using Layers and a Mask in PSE10; obviously the more stacked the harder the job:
and everybody is invited to add focus stacked images here
In all a slave flash bounced in an umbrella set by trial and error is used.
 Helpful Posts: 0
Results 1 to 14 of 14
Thread: Three ways to do the same thing.
-
17th April 2012, 04:36 PM #1


- Join Date
- Sep 2009
- Location
- Burton on Trent, UK
- Posts
- 4,788
- Real Name
- Steve
Three ways to do the same thing.
-
17th April 2012, 05:27 PM #2

- Join Date
- Sep 2011
- Location
- Columbus, Ohio, USA
- Posts
- 1,960
- Real Name
- Kevin
Re: Three ways to do the same thing.
Hi, Steve
I have just recently started to fiddle with focus stacking, and it is indeed trickier than I'd anticipated. I have downloaded a trial of Zerene Stacker, and initially am somewhat skeptical of the alignment algorithm. I used it below, utilizing 4 focus points

-
17th April 2012, 07:21 PM #3
- Join Date
- Sep 2009
- Location
- Burton on Trent, UK
- Posts
- 4,788
- Real Name
- Steve
Re: Three ways to do the same thing.
That is an impressive image Kevin; Is there any tips on how to focus. You mentioned focus points but I only had to nudge the focus ring for everything to be out of focus.
Do you look at separate things to focus on, do you focus on the edge of in focus or use the middle of DOF, which is the best software for stacking??
I hope everybody has a go; because macro shots have so little DOF, but also there is potential for other images. Anyway, cheers
-
17th April 2012, 07:41 PM #4
- Join Date
- Jan 2009
- Location
- South Devon, UK
- Posts
- 14,736
Re: Three ways to do the same thing.
I tried a couple of stacking programmes once, Steve, but I wasn't really happy with the results.
But that was a little while ago, so things may have improved since then.
I found, when it did work (but very slowly) I ended up with excessively sharpened results, a bit like extreme HDR.
However, using the Auto Align option of CS5 usually works fairly well. Then either Auto Blend or hand merge with layers and masks as you did.
And to me, your effort looks totally natural.
Also remember, this effect can be useful for landscapes.
I did pass my method notes to a friend with Elements 10 and he said that although the system is slightly different there he did get acceptable results.
Moving the focus point does produce slightly different sized images which could be a problem, but I find the CS5 Auto Align manages to successfully stretch/shrink and rotate the images sufficiently to work OK.
-
17th April 2012, 08:05 PM #5

- Join Date
- Dec 2009
- Location
- WNY
- Posts
- 36,716
- Real Name
- John
Re: Three ways to do the same thing.
I believe there is a video tutorial on the Helicon website. I tried it myself and had similar issues.
-
17th April 2012, 10:27 PM #6

- Join Date
- Oct 2010
- Location
- Sussex, UK
- Posts
- 471
- Real Name
- Alex
Re: Three ways to do the same thing.
I've tried a bit of focus stacking recently. You need to appreciate the depth of field that you are working with. For this you need to get a depth of field chart or app for your phone and a tape measure. An online tool is here:
http://www.dofmaster.com/dofjs.html
You can measure the distance to the object and then look up the depth of field for your aperture. Then make sure that each image in your stack is less than that distance apart. You should then have a good set of images with clear focus for all the depth of field you want to cover.
Note that if you use a higher F-number then the depth of field will be better and so you need less shots. However you will need more light and will cross into the diffraction limited apertures where the image is a bit soft. This can affect the focus stacking software since it wants really sharp images. So for the best results I shoot at about F8 or less.
Getting the right distance between images is hard to do by focus racking the lens. The focus throw is quite short on many autofocus lenses so they do not have to move the elements as far. I use a focus rail allowing measured adjustment:
http://www.manfrotto.com/micro-posit...-sliding-plate
Here's an example of a recently stacked image:

The flower was about 35cm away. Shooting with an F8 lens @ 100mm gives a depth of field of 2.7mm on a crop camera. I moved the rail about half that between shoots. That produced a stack of 12 images. Here is one for reference:

You can see that the image looks OK even with a 2.7mm depth of field. This is because focus falls off and does not just stop outside of 2.7mm. However it clearly does fall away. It is more apparent on the original image which is 3000+ pixels square.
Note the the final image has had some manual retouching done. Expect to have to do this. There is no magic solution to make it all work since when you change focus at close distance you will change the perspective. This leads to alignment problems and so errors in the stacked image.
As with panoramas you must ensure exposure and white balance are the same across the shots. I then do some fine detail capture sharpening before stacking. I found this to help the stacking algorithm when dealing with the low contrast regions of petals. Every bit of sharpness helps. But when I am not happy with the stacking the first thing I try is turning off the capture sharpening.
I found that the Photoshop algorithm does not handle flowers as well as Helicon Focus or Zerene Stacker. Photoshop seems to take any pixel areas from the first frame that are in focus and does not consider the image stack order. Once an area is taken as in focus then a sharper region in a later frame does not override the prior softer pixels. In this way Photoshop has a greedy algorithm where the first frame used is critical since it will set the standard and may be over used even though better frames exist. The dedicated stacking software require the frames to be in depth order and provide region growing algorithms starting from small areas of clearly good focus. The double pass algorithm of Helicon Focus allows refinement of a first pass. Unfortunately in this case it seems like you get what you pay for since it costs the most.
Here is a nice summary article for reference and the author has some great images in his gallery:
http://www.geofflawrence.com/focus_stacking.html
Alex
-
17th April 2012, 11:50 PM #7
- Join Date
- Sep 2009
- Location
- Burton on Trent, UK
- Posts
- 4,788
- Real Name
- Steve
Re: Three ways to do the same thing.
Cheers Geoff and John; I became interested after I got Helicon Filter 5 and thought it was only going to be a matter of using a tripod and a little effort to get a good image. Not the case and I had to add a remote switch because even with the tripod touching the camera moved it, also I've already said the focus ring is much too sensitive and that is with an L type.
However I know some have mastered the technique, like Alex who's image is amazing; and I really appreciate their input. Cheers Alex.
-
18th April 2012, 02:03 AM #8

- Join Date
- Dec 2011
- Location
- New England
- Posts
- 9,072
- Real Name
- Dan
Re: Three ways to do the same thing.
I stack a large number of images, always using Zerene (although I have also used combine Z and CS5).
Here's my drill:
-- obviously, use a tripod. do not change the position of the camera during the stack.
--perspective will change as you focus in or out, so make sure you have enough space around the portion of the image you want.
--focus on the nearest part of the image you want in focus. Live view with 5 or 10x enlargement is best. Shoot around f/8 for a bit of leeway.
--move the focus slightly for each subsequent image. To play it safe, go beyond what you think is the final image you want.
--Use a remote release (i use a cheap cable release) and mirror lock up.
Re this comment:
This is not my experience. Whether retouching is needed depends on the particular image. Particularly problematic are images in which two surfaces that are next to each other in the 2-dimensional image are relatively far apart in terms of distance from the lens. this tends to cause haloing that requires retouching. However, images without that problem often need no retouching at all. Zerene has a very good retouching tool for this and other problems.Note the the final image has had some manual retouching done. Expect to have to do this. There is no magic solution to make it all work since when you change focus at close distance you will change the perspective. This leads to alignment problems and so errors in the stacked image.
--Zerene has two stacking algorithms (PMax and DMap) that in some cases behave very differently. it is worth doing both. For flowers, I find DMap is usually superior--better textures, saturation, and color fidelity--but it is a bit more prone to haloing.
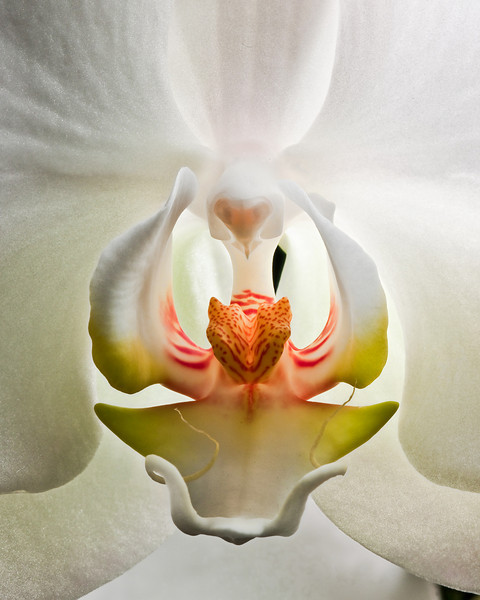
If you look at the 'flowers' and 'wilted flowers' galleries on my site, dkoretz.smugmug.com, you will see lots of images stacked with Zerene, often with 3-5 images, but some with many more. Many of these required no touching up. I'll post a few here that did not need touching up, if I recall correctly.
Even though many don't need retouching, in my experience, once you get the hang of it, it is still a complicated process, and a lot can go wrong. You just need to practice and accept that some just won't work well.

-
18th April 2012, 02:06 AM #9

- Join Date
- May 2011
- Location
- Fort Mill, South Carolina, USA
- Posts
- 6,294
- Real Name
- Frank Miller
Re: Three ways to do the same thing.
I've played with focus stacking a bit and still feel I have a lot to learn. Considering only the shooting of the images as a start, I usually (but not always) use a tripod, so considering a tripod is in use, the first thing I do is see what the real depth of the subject is that I want in focus.
If the total depth is less than the range of my slide rail, such as jewelry, a set of keys or such, then I'll use the slide rail.
If the total depth exceeds the range of the slide rail, such as shooting down the stalk of a flower or a really deep landscape, I'll use the focus ring and set the aperture for a shallow DoF. I can then test to see how far I need to turn the focus ring to go from close sharp to far sharp.
I can then set the aperture for conditions such as subtle subject movement to get an acceptable ISO and shutter speed. Finally, I shoot closer (slightly out of focus) and manually twist the focus ring as little as I can and continue to shoot/twist until I am past the far focus point determined before I start.
I don't look through the viewfinder except to ensure that the first is slightly closer and the last is slightly past the point I previously determined and that the center focus dot in the viewfinder hasn't moved. How many images do I shoot? I don't care as the important thing is that as much as possible, I twist the focusing ring an even amount and as little as possible each time. The software doesn't care if it get 5 or 15 images, and the more images, the better the chances of the final result being good.
I'll save the post processing steps for a later post if folks are interested.
-
18th April 2012, 08:00 AM #10
- Join Date
- Oct 2010
- Location
- Sussex, UK
- Posts
- 471
- Real Name
- Alex
Re: Three ways to do the same thing.
Thanks for the caveats Dan. I have only stacked images with problems so far. It makes sense that it depends on the shape. A real 3D shape will have the most perspective shift and so regions where no in focus pixels are available to complete the image. This causes the haloing we are discussing. It is a halo of focus blur and not the usual sharpening halos of tone changes. It is always at edges of depth along your z-axis. In this case you simply clone the texture back from a source image. Originally Posted by DanK

Nice orchid photo.
Alex
-
18th April 2012, 08:58 AM #11
- Join Date
- Sep 2009
- Location
- Burton on Trent, UK
- Posts
- 4,788
- Real Name
- Steve
Re: Three ways to do the same thing.
Zerene looks like a good program Dan, cheers Frank it looks like I need a rail and I forgot about the zoom on live view. This looks really interesting.
-
18th April 2012, 09:16 AM #12
- Join Date
- Aug 2010
- Location
- Stockholm, Sweden (and sometimes Santiago de Cuba)
- Posts
- 1,088
- Real Name
- Urban Domeij
Re: Three ways to do the same thing.
Among all problems one can run into, there's also the one of the subject becoming tired. Flowers are not rigid, flowers can move, although maybe very slowly.
A good help for many of the problems encountered is either running a stacking program in the camera or shooting tethered and applying a macro for the focus shifts to do them in rapid succession without touching anything. I haven't used Magic Lantern, but there might be tools in it also for focus racking. It can be done successfully in CHDK för Canon compact cameras. CHDK can do it without user intervention; maybe ML as well?Last edited by Inkanyezi; 18th April 2012 at 09:35 AM.
-
18th April 2012, 12:50 PM #13
- Join Date
- Dec 2011
- Location
- New England
- Posts
- 9,072
- Real Name
- Dan
Re: Three ways to do the same thing.
Thanks. That's what I meant, but you wrote it more clearly. At the bottom back edge of my rudbeckia shot, you can see an edge that has this kind of haloing. I missed it when I did the stack.It is a halo of focus blur and not the usual sharpening halos of tone changes. It is always at edges of depth along your z-axis. In this case you simply clone the texture back from a source image.
The majority of macro shooters I know use it much of the time. It's reasonably fast, more flexible than the alternatives, and has good retouching capabilities. The author has a good video on his website showing some very elaborate retouching.Zerene looks like a good program
I doubt it. I do stacked macros more than anything else and don't even own one. Unless you are going to do very high levels of magnification, say, more than 1.5:1, you can make do just fine by leaving the camera static and adjusting focus. I have never gone above 2:1 and rarely go even to 1.5:1, but some people who do higher magnification find a rail very helpful.it looks like I need a rail
I hope folks keep posting results and comments about stacking. It is complicated, and we can learn from each other's efforts.
-
18th April 2012, 08:25 PM #14
- Join Date
- Sep 2009
- Location
- Burton on Trent, UK
- Posts
- 4,788
- Real Name
- Steve
Re: Three ways to do the same thing.
I hope so too Dan; I think maybe I should have just called it Focus Stacking, and not the obscure way I have.I hope folks keep posting results and comments about stacking. It is complicated, and we can learn from each other's efforts.


 Reply With Quote