
 Helpful Posts:
 Ah, caught!Originally Posted by ScoutR

Although, in a manner of speaking I have been - I promised John (woty87) I would PP one of his RAWs as my Week 4 work, but then decided as it wasn't my image, it'd be better to do it as a separate thread, so now I still have to do a week 4 here (and 5 and 6)
However, I think I have taken at least some images each week and learnt from them, so watch this space ...
Results 41 to 60 of 184
Thread: Project 52 by Dave Humphries
-
5th February 2012, 04:44 PM #41Moderator


- Join Date
- May 2008
- Location
- Windsor, Berks, UK
- Posts
- 16,769
- Real Name
- Dave Humphries :)
Re: Week 3 of Project 52 by Dave Humphries
-
9th February 2012, 08:40 PM #42

- Join Date
- May 2008
- Location
- Tunbridge Wells, Kent
- Posts
- 121
- Real Name
- Rebecca
Re: Week 3 of Project 52 by Dave Humphries
Originally Posted by ScoutR
Wendy I think we need to take it in turns to 'encourage' him - eagerly awaiting week 4 picture hint hint Mr Humphries
-
9th February 2012, 08:45 PM #43
- Join Date
- Aug 2009
- Location
- Canada
- Posts
- 3,113
- Real Name
- Wendy
Re: Week 3 of Project 52 by Dave Humphries
Watching....watching...still watching....waiting. Originally Posted by Dave Humphries
I have my week 5 ready to post, but I usually wait till Sunday. Still not sure if I'm behind a week though, so I might post early. It's a PP exercise trying something I haven't tried before, so I'll need lots of help (again)
Wendy
-
9th February 2012, 11:10 PM #44

- Join Date
- Nov 2011
- Location
- Gold Coast, Australia
- Posts
- 1,798
- Real Name
- Mal
Re: Week 3 of Project 52 by Dave Humphries
I think Week 7 begins on Sunday Originally Posted by ScoutR

-
10th February 2012, 12:45 AM #45
- Join Date
- Aug 2009
- Location
- Canada
- Posts
- 3,113
- Real Name
- Wendy
Re: Week 3 of Project 52 by Dave Humphries

 Point taken. I've posted week 6 so I'm caught up now
Ahem, Dave I even have a goal for week 7. The ball's in your court
Wendy
-
10th February 2012, 01:18 AM #46Moderator
- Join Date
- May 2008
- Location
- Windsor, Berks, UK
- Posts
- 16,769
- Real Name
- Dave Humphries :)
Re: Week 4 of Project 52 by Dave Humphries
OK, OK, sorry I'm late (again)

Nikon D5000 + Nikon 70-300mm VR: 300mm, 1/750s, f/8, iso400 (218-45790)
F11 and click image to see at 1,224px × 950px
This is a manipulated image; for compositional reasons, I had to move the aircraft 'back' along it's flight path by a couple of seconds (so it was 'approaching' the moon). The image I had of it when it did pass (almost) this close, wasn't sharp enough and the one where it had passed the moon just didn't look right at all.
I did a WB on the moon, the light hitting the plane is actually the rising sun; hence the warmer colour and different angle, from way over camera left.
I did Local Contrast Enhance the plane and moon, but on separate layers (to use different amounts and radii) and then I erased/merged the layers.
The plane was moved with the clone stamp tool, compositionally it looked best with the plane and moon on their respective 'third' intersections.
Ideally perhaps, I'd have liked it better without the wheel bays opening, but it was on approach to Heathrow.
My view is that this is only 'so-so', although the sky came up nicer than expected.
Let C&C commence ...
Thanks,
-
10th February 2012, 02:46 AM #47
- Join Date
- Nov 2011
- Location
- Nebraska
- Posts
- 949
- Real Name
- Kathy
Re: Week 4 of Project 52 by Dave Humphries
All I can say is WOW! Very Impressive!!
Kathy
-
10th February 2012, 02:07 PM #48
- Join Date
- Jan 2009
- Location
- South Devon, UK
- Posts
- 14,841
Re: Week 4 of Project 52 by Dave Humphries
I see what you mean, Dave, this should be an absolutely stunning image but it somehow seems a bit flat.
I'm wondering if there is a little bit too much blue sky particularly on the left so the main elements are getting slightly 'lost' amongst the blue.
Using the old trick of holding some paper against my screen I find that reducing the sky on the left and top, possibly a bit on the bottom as well, appears to double the 'wow factor'.
Just a thought.
-
10th February 2012, 04:19 PM #49
- Join Date
- Aug 2009
- Location
- Canada
- Posts
- 3,113
- Real Name
- Wendy
Re: Week 4 of Project 52 by Dave Humphries
Great shot Dave and only 2 more to go until you are caught up.
I was very interested when you said you moved the plane with the clone tool. I've never tried that before, so of course I had to go off and give it a go. While looking for an image to work on I realized why I had not tried it. unless I'm missing something there are not too many images that this would work on. Yours was the perfect candidate with that clear and evenly blue sky. I've looked and looked and if you had not mentioned it I do not see any evidence that the plane was moved in PP.
I managed to find some of my attempted Bird in flight shots that I hadn't binned. No clouds in the sky and the sky was a pretty even colour. I managed to get the cloning done and it works OK BUT, the cloned bird is lighter and does not a appear as sharp as the one it was cloned from.
Are there special settings I should use when cloning or do you have to doctor it up afterwards. Right now I only use cloning for removing things. My settings are:
Mode: Normal
Opacity: 100%
Aligned: checked
Sample All Layers: checked
Hmmmm, sounds like another good trick and I'm thinking maybe this merging of layers might be the answer to the problems I am having with my latest project 52 experiment. I am assuming that if the layers are merged any edits are done to the whole shot as opposed to one layer at a time which was the problem I was having and did not know how to solve.I did Local Contrast Enhance the plane and moon, but on separate layers (to use different amounts and radii) and then I erased/merged the layers.
-
10th February 2012, 06:27 PM #50
- Join Date
- Nov 2011
- Location
- Gold Coast, Australia
- Posts
- 1,798
- Real Name
- Mal
Re: Week 4 of Project 52 by Dave Humphries
I was thinking the same thing with regards to it feeling flat when there are stunning elements in the shot. Geoff's suggestion might be worth a shot. Originally Posted by Geoff F
-
10th February 2012, 09:02 PM #51Moderator
- Join Date
- May 2008
- Location
- Windsor, Berks, UK
- Posts
- 16,769
- Real Name
- Dave Humphries :)
Re: Week 4 of Project 52 by Dave Humphries
Originally Posted by Geoff F
Yeah, Originally Posted by Goldcoastgolfer
I think you are both right - just goes to show that being a slave to the rule of thirds is a bad thing
I actually ended up taking a bit off all four sides, I did as suggested first, but when viewed online, there was too much space behind the jet, so back for another crop

I considered trying to be smarty-pants and cloning in a rotated moon, as it is in the corner, but decided that wouldn't look right as the light from our one sun would be coming from two different angles
Thanks guys,
-
10th February 2012, 09:09 PM #52
- Join Date
- May 2008
- Location
- Tunbridge Wells, Kent
- Posts
- 121
- Real Name
- Rebecca
Re: Week 4 of Project 52 by Dave Humphries
I like the second crop, the picture looks even more impressive. You've done well to get detail on both the moon and plane considering how far away they are. Nice picture
-
10th February 2012, 09:27 PM #53
- Join Date
- Nov 2011
- Location
- Gold Coast, Australia
- Posts
- 1,798
- Real Name
- Mal
Re: Week 4 of Project 52 by Dave Humphries
Yep - that looks much better. The tigheter view of the moon and plane give a much better impresion of depth to the overall photo.
-
10th February 2012, 09:28 PM #54
- Join Date
- Jan 2009
- Location
- South Devon, UK
- Posts
- 14,841
Re: Week 4 of Project 52 by Dave Humphries
Yes 'that's the way to do it'. A lot more zap factor with the crop.
-
10th February 2012, 09:40 PM #55

- Join Date
- May 2011
- Location
- Brisbane Australia
- Posts
- 4,636
- Real Name
- Dave Ellis
Re: Week 4 of Project 52 by Dave Humphries
Very nice shot Dave. I like the way the sun is filtering in from the side. Second crop for me too.
Dave
-
10th February 2012, 10:20 PM #56Moderator
- Join Date
- May 2008
- Location
- Windsor, Berks, UK
- Posts
- 16,769
- Real Name
- Dave Humphries :)
Re: Week 4 of Project 52 by Dave Humphries
Thanks Kathy Originally Posted by Kathy O
I'm getting there Wendy, another tomorrow (maybe) Originally Posted by ScoutR
Before cloning, the jet was just in the top left corner of the original crop, you could still see from left engine to tail. Originally Posted by ScoutR
I was exceptionally lucky - I didn't know skies could be this even in tone - I was amazed (still am) that I didn't have to do anything to blend the sky around plane in despite moving it down abit and across.
They are all the same as I used, although in addition I had 100% Flow and, possibly this is the knack, on this image I had enough space to use a huge brush; the circle was larger than the plane, although due to soft edge, I had to wiggle it around a bit to get the extremities fully cloned in. Originally Posted by ScoutR
I don't know, I just keep it simple, so when I'd finished doing the LC Enhancements, I flattened the image. Then I made a safety layer before I did the clone move of plane in case that didn't work out, but got rid of it when it did. Originally Posted by ScoutR
Cheers,
-
10th February 2012, 10:46 PM #57Moderator
- Join Date
- May 2008
- Location
- Windsor, Berks, UK
- Posts
- 16,769
- Real Name
- Dave Humphries :)
Re: Week 4 of Project 52 by Dave Humphries
Thanks, the focus point was (almost) on the moon, not what I'd have thought would give a sharp plane Originally Posted by beckyhumphries

Cheers,
-
10th February 2012, 10:55 PM #58Moderator
- Join Date
- May 2008
- Location
- Windsor, Berks, UK
- Posts
- 16,769
- Real Name
- Dave Humphries :)
Re: Week 4 of Project 52 by Dave Humphries
Originally Posted by dje
Thanks Dave.
I have always wanted to get a shot like this and have previously been out driving about to get the angle between flight path and moon suitable, but never succeeded.
Then, unexpectedly, I see it from my bedroom window one morning
So, fetch the camera out and start shooting (having opened the window on a frosty morning) - it was only about every 8th plane that lined up on the alternate runway to land, most go right over our heads and miss the moon.
The low sun is a bonus
To me, the odd thing about the 2nd crop is that the tighter one seems more 'artificial' because I saw the wider view through the viewfinder - the original wasn't a huge crop.
Thanks,Last edited by Dave Humphries; 10th February 2012 at 11:06 PM.
-
12th February 2012, 01:09 PM #59Moderator
- Join Date
- May 2008
- Location
- Windsor, Berks, UK
- Posts
- 16,769
- Real Name
- Dave Humphries :)
Re: Week 5 of Project 52 by Dave Humphries
Week 5 subject was a squirrel, this was shot in a park in Leicester - it was quite dim under the trees and I was amazed how good (sharp) this was for the 1/45s shutter speed, focal length and the subject's normal disposition to sudden twitches.
SOOC (EXIF; Nikon D5000 + Nikon 70-300mm VR: 145mm, 1/45s, f/8, iso800):
The challenges it presents are mainly separating a grey/brown squirrel from a brown, 'fussy' background on which it is standing and I am shooting down at about 45 degree angle, plus it was under a bush, the branches of which were a distraction after the intended crop.
Crop intended:
I decided the holly leaf, although it gave a splash of colour, distracted from the subject more than its worth.
Processing steps...
After being indecisive about the correct White balance looking at this image, I eventually set it by comparison to a tarmac grey in another shot to make deceision - I must (Must, MUST) start shooting a grey reference using the WhiBal card!!!")
Minimal processing in ACR, increase exposure by 1/2 stop.
Duplicated to two more layers so I could treat the subject and background independently throughout processing - apart from the cloning on background, it is unenhanced so as to 'play down' its presence in comparison to the squirrel.
Before cropping, I used the background top right of the original SOOC shot to clone over the area of bush branches I didn't want in the final image.#
Then crop applied.
The subject layer was given some Local Contrast Enhancement (LCE) plus two initial sharpening passes while the image was still full size.
The upper 'Background Processing' layer was erased over the squirrel with a 34% flow, so it takes 3 passes to completely erase, this allowed a kind of feathering at the furry edges so there's no sharp edge to the enhanced areas just 'outside' the squirrel's outline.
Not sure if I explained that very well, here's what I mean;
Downsized, followed by a final sharpen, again only on the squirrel.
Layers flattened and then Saved as jpg
(I also saved as PSD with layers at several points in processing, just in case I needed to 'back out' - not eventually needed, but would have, had I not retained the separate layers until the last minute, since that allowed me undo the flatten, then dive in to background layer and clone over something nasty and resave)
Hope all that detail was useful to someone!
Result of all that PP (about 3 hours, including writing it all up):
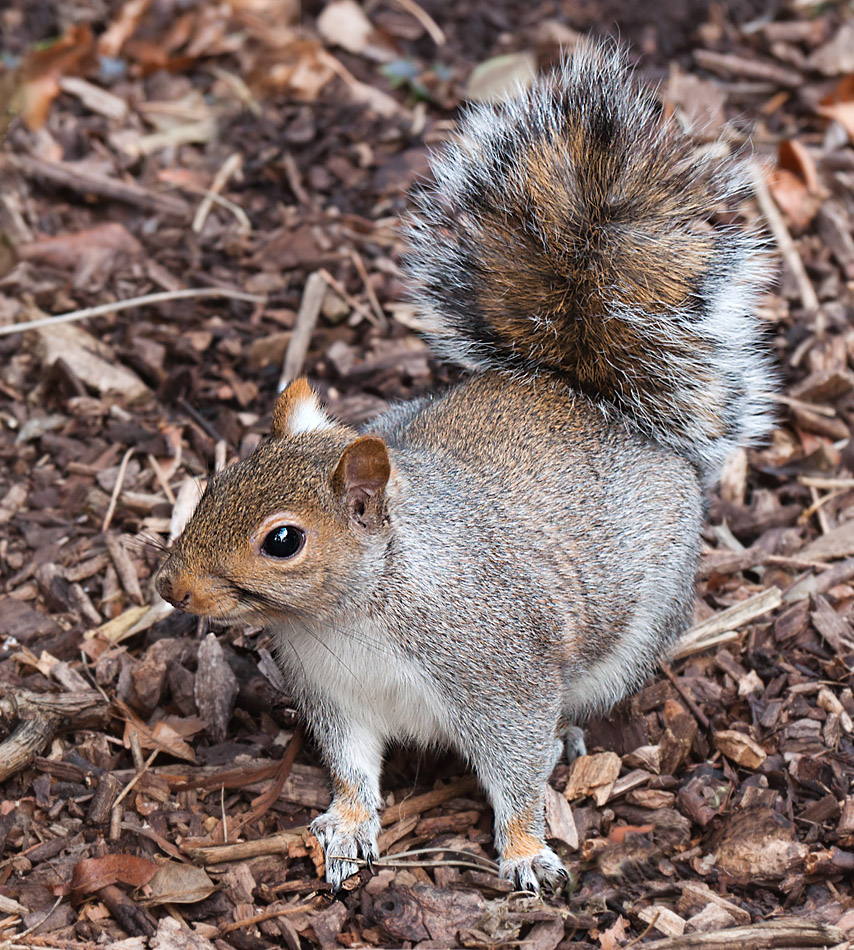
Nikon D5000 + Nikon 70-300mm VR: 145mm, 1/45s, f/8, iso800 (219-45909)
F11 and click image to see at 854px × 950px in Lytebox
Thanks for viewing (and commenting),
-
12th February 2012, 01:46 PM #60

- Join Date
- Jul 2011
- Location
- Victoria Australia
- Posts
- 600
Re: Week 5 of Project 52 by Dave Humphries
Hi Dave , the 3 hours spent on PP paid off well, thanks for the tutorial on how you did this, very clear.
The squirrel stands out well from the similar coloured back ground, good focus around the eye, looks like he is smiling.
I liked the holly leaf

 Reply With Quote