UNDERSTANDING CAMERA AUTOFOCUS
A camera's autofocus system intelligently adjusts the camera lens to obtain focus on the subject, and can mean the difference between a sharp photo and a missed opportunity. Despite a seemingly simple goal—sharpness at the focus point—the inner workings of how a camera focuses are unfortunately not as straightforward. This tutorial aims to improve your photos by introducing how autofocus works—thereby enabling you to both make the most of its assets and avoid its shortcomings.
Note: Autofocus (AF) works either by using contrast sensors within the camera (passive AF) or by emitting a signal to illuminate or estimate distance to the subject (active AF). Passive AF can be performed using either the contrast detection or phase detection methods, but both rely on contrast for achieving accurate autofocus; they will therefore be treated as being qualitatively similar for the purposes of this AF tutorial. Unless otherwise stated, this tutorial will assume passive autofocus. We will also discuss the AF assist beam method of active autofocus towards the end.
CONCEPT: AUTOFOCUS SENSORS
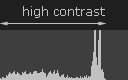
A camera's autofocus sensor(s) are the real engine behind achieving accurate focus, and are laid out in various arrays across your image's field of view. Each sensor measures relative focus by assessing changes in contrast at its respective point in the image — where maximal contrast is assumed to correspond to maximal sharpness.
| Change Focus Amount: | ||
| Blurred | Partial | Sharp |
400% |
 Sensor Histogram |
Please visit the tutorial on image histograms for a background on image contrast.
Note: many compact digital cameras use the image sensor itself as a contrast sensor (using a method called contrast detection AF), and do not necessarily have multiple discrete autofocus sensors (which are more common using the phase detection method of AF). Furthermore, the above diagram illustrates the contrast detection method of AF; phase detection is another method, but this still relies on contrast for accurate autofocus.
The process of autofocusing generally works as follows:
(1) An autofocus processor (AFP) makes a small change in the focusing distance.
(2) AFP reads the AF sensor to assess whether and by how much focus has improved.
(3) Using the information from (2), the AFP sets the lens to a new focusing distance.
(4) The AFP may iteratively repeat steps 2-3 until satisfactory focus has been achieved.
This entire process is usually completed within a fraction of a second. For difficult subjects, the camera may fail to achieve satisfactory focus and will give up on repeating the above sequence, resulting in failed autofocus. This is the dreaded "focus hunting" scenario where the camera focuses back and forth repeatedly without achieving focus lock. This does not, however, mean that focus is not possible for the chosen subject. Whether and why autofocus may fail is primarily determined by factors in the next section.
FACTORS AFFECTING AUTOFOCUS PERFORMANCE
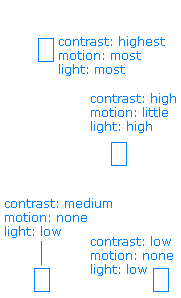
The photographic subject can have an enormous impact on how well your camera autofocuses—and often even more so than any variation between camera models, lenses or focus settings. The three most important factors influencing autofocus are the light level, subject contrast and camera or subject motion.

An example illustrating the quality of different focus points has been shown to the left; move your mouse over this image to see the advantages and disadvantages of each focus location.
Note that each of these factors are not independent; in other words, one may be able to achieve autofocus even for a dimly lit subject if that same subject also has extreme contrast, or vice versa. This has an important implication for your choice of autofocus point: selecting a focus point which corresponds to a sharp edge or pronounced texture can achieve better autofocus, assuming all other factors remain equal.
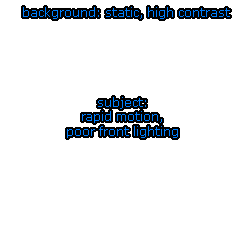
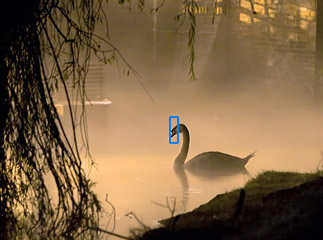
In the example to the left we were fortunate that the location where autofocus performs best also corresponds to the subject location. The next example is more problematic because autofocus performs best on the background, not the subject. Move your mouse over the image below to highlight areas of good and poor performance.
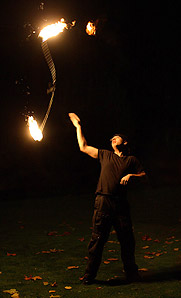
In the photo to the right, if one focused on the fast-moving light sources behind the subject, one would risk an out-of-focus subject when the depth of field is shallow (as would be the case for a low-light action shot like this one).
Alternatively, focusing on the subject's exterior highlight would perhaps be the best approach, with the caveat that this highlight would change sides and intensity rapidly depending on the location of the moving light sources.
If one's camera had difficulty focusing on the exterior highlight, a lower contrast (but stationary and reasonably well lit) focus point would be the subject's foot, or leaves on the ground at the same distance as the subject.
What makes the above choices difficult, however, is that these decisions often have to be either anticipated or made within a fraction of a second. Additional specific techniques for autofocusing on still and moving subjects will be discussed in their respective sections towards the end of this tutorial.
NUMBER & TYPE OF AUTOFOCUS POINTS
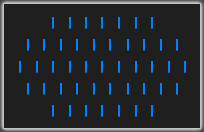
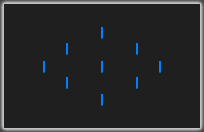
The robustness and flexibility of autofocus is primarily a result of the number, position and type of autofocus points made available by a given camera model. High-end SLR cameras can have 45 or more autofocus points, whereas other cameras can have as few as one central AF point. Two example layouts of autofocus sensors are shown below:
| Max f/#: | f/2.8 | f/4.0 | f/5.6 | f/8.0 |
 |
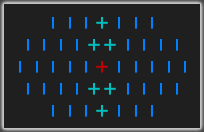 |
|||
| High-End SLR | ||||
| Max f/#: | f/2.8 | f/4.0 | f/5.6 |
|
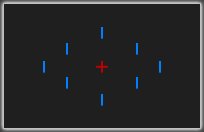 |
||
| Entry to Midrange SLR | |||
Cameras used for left and right examples are the Canon 1D MkII and Canon 20D, respectively.
For these cameras autofocus is not possible for apertures smaller than f/8.0 and f/5.6.
Two types of autofocus sensors are shown:
+ cross-type sensors (two-dimensional contrast detection, higher accuracy)
l vertical line sensors (one-dimensional contrast detection, lower accuracy)
Note: The "vertical line sensor" is only called this because it detects contrast along a vertical line.
Ironically, this type of sensor is therefore best at detecting horizontal lines.
For SLR cameras, the number and accuracy of autofocus points can also change depending on the maximum aperture of the lens being used, as illustrated above. This is an important consideration when choosing a camera lens: even if you do not plan on using a lens at its maximum aperture, this aperture may still help the camera achieve better focus accuracy. Furthermore, since the central AF sensor is almost always the most accurate, for off-center subjects it is often best to first use this sensor to achieve a focus lock (before recomposing the frame).
Multiple AF points can work together for improved reliability, or can work in isolation for improved specificity, depending on your chosen camera setting. Some cameras also have an "auto depth of field" feature for group photos which ensures that a cluster of focus points are all within an acceptable level of focus.
AF MODE: CONTINUOUS & AI SERVO vs. ONE SHOT
The most widely supported camera focus mode is one-shot focusing, which is best for still subjects. The one shot mode is susceptible to focus errors for fast moving subjects since it cannot anticipate subject motion, in addition to potentially also making it difficult to visualize these moving subjects in the viewfinder. One shot focusing requires a focus lock before the photograph can be taken.
Many cameras also support an autofocus mode which continually adjust the focus distance for moving subjects. Canon cameras refer to this as "AI Servo" focusing, whereas Nikon cameras refer to his as "continuous" focusing. It works by predicting where the subject will be slightly in the future, based on estimates of the subject velocity from previous focus distances. The camera then focuses at this predicted distance in advance to account for the shutter lag (the delay between pressing the shutter button and the start of the exposure). This greatly increases the probability of correct focus for moving subjects.
Example maximum tracking speeds are shown for various Canon cameras below:
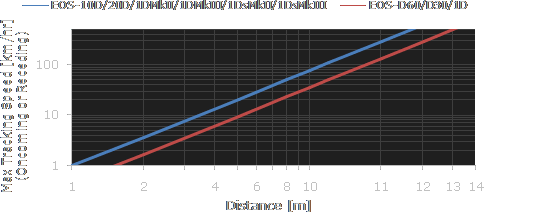
Values are for ideal contrast and lighting, and use the Canon 300mm f/2.8 IS L lens.
The above plot should also provide a rule of thumb estimate for other cameras as well. Actual maximum tracking speeds also depend on how erratic the subject is moving, the subject contrast and lighting, the type of lens and the number of autofocus sensors being used to track the subject. Also be warned that using focus tracking can dramatically reduce the battery life of your camera, so use only when necessary.
AUTOFOCUS ASSIST BEAM
Many cameras come equipped with an AF assist beam, which is a method of active autofocus that uses a visible or infrared beam to help the autofocus sensors detect the subject. This can be very helpful in situations where your subject is not adequately lit or has insufficient contrast for autofocus, although the AF assist beam also comes with the disadvantage of much slower autofocus.
Most compact cameras use a built-in infrared light source for the AF assist, whereas digital SLR cameras often use either a built-in or external camera flash to illuminate the subject. When using a flash for the AF assist, the AF assist beam may have trouble achieving focus lock if the subject moves appreciably between flash firings. Use of the AF assist beam is therefore only recommended for still subjects.
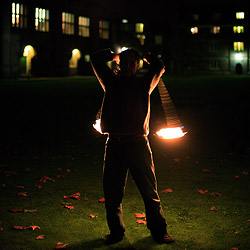
IN PRACTICE: ACTION PHOTOS
Autofocus will almost always perform best with action photos when using the AI servo or continuous modes. Focusing performance can be improved dramatically by ensuring that the lens does not have to search over a large range of focus distances.
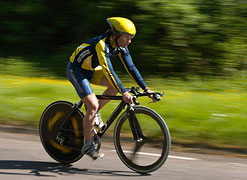
Perhaps the most universally supported way of achieving this is to pre-focus your camera at a distance near where you anticipate the moving subject to pass through. In the biker example to the right, one could pre-focus near the side of the road since one would expect the biker to pass by at near that distance.
Some SLR lenses also have a minimum focus distance switch; setting this to the greatest distance possible (assuming the subject will never be closer) can also improve performance.
Be warned, however, that in continuous autofocus mode shots can still be taken even if the focus lock has not yet been achieved.
IN PRACTICE: PORTRAITS & OTHER STILL PHOTOS
Still photos are best taken using the one-shot autofocus mode, which ensures that a focus lock has been achieved before the exposure begins. The usual focus point requirements of contrast and strong lighting still apply, although one needs to ensure there is very little subject motion.
For portraits, the eye is the best focus point—both because this is a standard and because it has good contrast. Although the central autofocus sensor is usually most sensitive, the most accurate focusing is achieved using the off-center focus points for off-center subjects. If one were to instead use the central AF point to achieve a focus lock (prior to recomposing for an off-center subject), the focus distance will always be behind the actual subject distance—and this error increases for closer subjects. Accurate focus is especially important for portraits because these typically have a shallow depth of field.
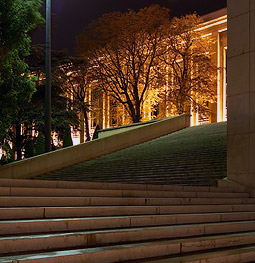
Since the most common type of AF sensor is the vertical line sensor, it may also be worth considering whether your focus point contains primarily vertical or horizontal contrast. In low-light conditions, one may be able to achieve a focus lock not otherwise possible by rotating the camera 90° during autofocus.
In the example to the left, the stairs are comprised primarily of horizontal lines. If one were to focus near the back of the foreground stairs (to maximize apparent depth of field using the hyperfocal distance), one could avoid a failed autofocus by first orienting their camera in landscape mode during autofocus. Afterwards one could rotate the camera back to portrait orientation during the exposure, if so desired.
Note that the emphasis in this tutorial has been on *how* to focus — not necessarily *where* to focus. For further reading on this topic please visit the tutorials on depth of field and the hyperfocal distance.