DEPTH OF FIELD CALCULATOR
A depth of field calculator is a useful photographic tool for assessing what camera settings are required to achieve a desired level of sharpness. For a background on what everything here means, also see the tutorial on depth of field.
Note: CF = "crop factor" (commonly referred to as the focal length multiplier)
USING THE CALCULATOR
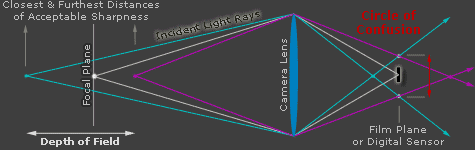
In order to calculate the depth of field, one needs to first decide on what will be considered acceptably sharp. More specifically, this is called the maximum circle of confusion (CoC), and is based on the camera sensor size (camera type), viewing distance and print size. The default is to say that features smaller than 0.01 inches are unnecessary, when viewed in an 8x10 inch print at a distance of 1 foot (~25 cm). However, people with 20-20 vision can see features 1/3 this size. This calculator therefore also has the ability to adjust for parameters such as viewing distance, print size and eyesight — thereby providing more control over what is "acceptably sharp".
Viewing Distance & Print Size. As the viewing distance increases, our eyes become less able to perceive fine detail in the print, and so the depth of field increases (max. CoC increases). Conversely, our eyes can perceive finer detail as the print size increases, and so the depth of field decreases (max. CoC decreases). A photo intended for close viewing at a large print size (such as in a gallery) will likely have a far more restrictive set of constraints than a similar image intended for display as a postcard or on a roadside billboard.
Visual Acuity. People with 20/20 vision can perceive details which are roughly 1/3 the size of those used by lens manufacturers (~0.01 in features for a 8x10 in print viewed at 1 ft) to set the standard for lens markings. Changing the eyesight parameter therefore has a significant influence on the depth of field. On the other hand, even if you can detect the circle of confusion with your eyes, the image may still be perceived as "acceptably sharp." This should serve only as a rough guideline to conditions where detail can no longer be resolved by our eyes.
Camera Type. This determines the size of your film or digital sensor, and thus how much the original image needs to be enlarged to achieve a given print size. Larger sensors can get away with larger circles of confusion because these images do not have to be enlarged as much, however they also require longer focal lengths to achieve the same field of view. Consult your camera's manual or manufacturer website if unsure what to enter for this parameter.
Lens focal length. This refers to the actual focal length in mm listed for your lens, NOT the "35 mm equivalent focal length" sometimes used. Most compact digital cameras have a zoom lens that varies on the order of 6 or 7 mm to about 30 mm (often listed on the front of your camera on the side of the lens). If you are using a focal length outside this range for a compact digital camera, then it is likely to be incorrect. SLR cameras are more straightforward as most of these use standard 35 mm lenses and clearly state the focal length, but be sure not to multiply the value listed on your lens by a crop factor (or focal length multiplier). If you have already taken your photo, nearly all digital cameras also record the actual lens focal length in the EXIF data for the image file.
Hyperfocal distance. This is the focus distance where everything from half the hyperfocal distance to infinity is within the depth of field. This is useful when deciding where to focus such that you maximize the sharpness within your scene, although I do not recommend using this value "as is" since sharpness is often more critical at infinity than in front of the focus distance. For more on this topic, please see "Understanding the Hyperfocal Distance."
IN PRACTICE
Care should be taken not to let all of these numbers get in the way of taking your photo. I do not recommend calculating the depth of field for every image, but instead suggest that you get a visual feel for how aperture and focal length affect your image. This can only be achieved by getting out there and experimenting with your camera. Once you have done this, the depth of field calculator can then be used to enhance those carefully planned landscape, macro, and low-light images where the range of sharpness is critical.
For a more in-depth background on this topic, please see:
"Understanding Depth of Field"
