CAMERA POLARIZING FILTERS
Polarizing filters can increase color saturation and decrease reflections — and are one of the only lens filters which cannot be replicated using digital photo editing. They are an indispensable tool that should be in every photographer's camera bag. However, developing an intuition for how a polarizer might impact a photo often requires extensive experimentation. This tutorial aims to accelerate that process by demonstrating how and why polarizing filters can help — and in some cases harm — different types of scenes.
OVERVIEW
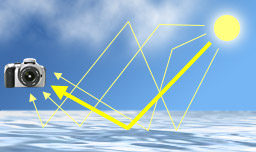
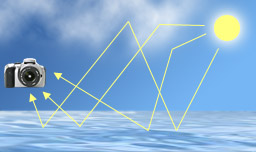
In the above example the polarizer removes the harsh direct glare from the water's surface.
Polarizers are placed in front of your camera lens, and work by filtering out sunlight which has been directly reflected toward the camera at specific angles. This is beneficial because the remaining light is often more diffuse and colorful, but it also requires a longer exposure time (since light has been discarded). The angle that is filtered is controlled by rotating the polarizer itself, and the strength of this effect can be controlled by changing the camera's line of sight relative to the sun.
USING POLARIZERS: SUN ANGLE & FILTER ROTATION
A polarizing filter will be capable of its maximum effect when one's line of sight (in red below) is perpendicular to the direction of the sun:
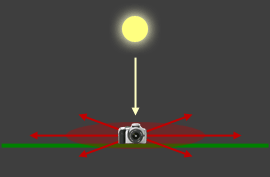
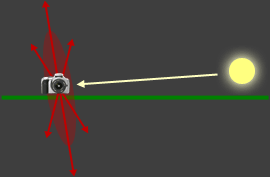
The red disks represent the directions of maximum polarizing capability.
The green lines represent the ground/horizon.
A good way to visualize this is to aim your pointer finger at the sun while holding your thumb straight up. Everywhere your thumb points when you rotate your hand (while still pointing at the sun) is where the polarizer is capable of the strongest impact.
However, just because the filter is capable of its maximum effect in the above directions, this doesn't necessarily mean this is where the image will appear most effected. Rotating your filter will toggle the angle (relative to the sun) that appears most polarized. The best way to get a feel for this is to rotate the filter while looking through the camera's viewfinder (or rear LCD), but you can also consult the box below for specifics on how this process works.
Notes on Filter Rotation Angle. At one extreme, you can rotate your filter so that the direction of maximum polarization will be perpendicular to the direction of the sun (as shown in the above examples). In that case, the polarizing effect will be as pronounced as possible. If you then rotate your filter just a little (say 10-20°), you can shift the angle of maximum effect slightly towards or away from the sun, but in this case the polarizing effect won't be as pronounced as before. As this angle gets progressively closer to the direction into or away from the sun, the polarizing effect will appear progressively less pronounced. Finally, once the filter has been rotated a full 90° (to the other extreme), then no polarizing effect will be visible. Any more rotation than this and the polarizing effect increases again and the cycle repeats.

Hearst Castle - San Simeon, CA
Since a polarizer's effect varies with angle, results can appear uneven when using a wide angle lens. Some portions of the scene might be in a direction which is directly into the sun, whereas others might be at a right angle to the sun. In that case, one side of the photo would have a strong polarizer effect, whereas the other side would not.
In the example to the left, the sun was near the horizon, so the strip of sky directly overhead was most influenced by the polarizer (causing it to appear darker), whereas the upper left and lower right regions (nearer the horizon) were much less impacted. If a telephoto lens had been used to photograph just the tower, then the sky would have appeared much more even.
Although wide angle lenses certainly aren't ideal, rotating the polarizing filter can sometimes make the effect appear more realistic. One approach is to ensure that the most pronounced polarization coincides with the image's edge or corner. This way the change in polarization will look more like a natural gradient across the sky (such as how the sky might appear during twilight).
COLOR SATURATION
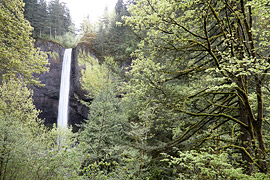
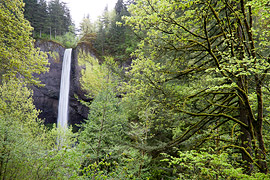
One of the first characteristics that you're likely to notice with polarizers is how they increase color saturation:
Columbia River Gorge State Park - Oregon, USA
When direct reflections are reduced, a greater fraction of the subject's light is of the diffuse variety — resulting in a more colorful representation. Foliage will be rendered with a brighter green, skies will have a deeper blue and flowers will appear more intense.
| Select: | No Polarizer | Polarizer at Max |
 |
||
However, saturation isn't always increased uniformly. This all depends on whether a particular object is at an optimal angle to the sun, and whether this object is highly reflective. In general, more reflective objects will see a greater increase in saturation when using a polarizer. Clear sunny days are also much more heavily influenced by polarizers than overcast or rainy days.
In the example to the right, the effect on the stone and foliage is subtle, but the sky becomes a noticeably darker blue. Take care not to overdo this effect; unusually dark mid-day skies or overly vibrant foliage can easily make photos appear unrealistic.
REFLECTIONS, WINDOWS & TRANSPARENCY
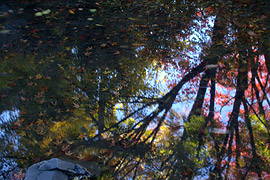
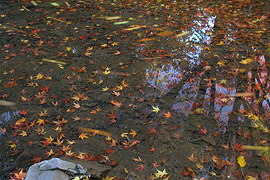
A polarizing filter can be an extremely powerful tool for removing reflections and isolating objects which are wet, underwater or behind a window. In the example below, a polarizer enables the photographer to select between subjects which are reflected from or are underneath the water's surface:
above examples are courtesy of rickleemorlang
In the above example, note how the polarizer was unable to remove reflections entirely (although it did a pretty good job). This isn't ever possible, but fortunately polarizers are usually able to make reflections imperceptible unless they're relatively intense. Unfortunately the one exception is with metal surfaces — which often also happens to be the brightest and least desirable type of reflection.

above example
courtesy of mararie
A polarizer can also remove unwanted reflections when taking a photo out of a window or other transparent barrier. Move your mouse over the example to the left to see how a polarizer eliminates the window reflections. This can be a very useful tool when photographing objects within store windows, out a moving train or within a glass case, for example.
However, polarizers can also sometimes create an unrealistic-looking rainbow or ripple effect on windows which are uneven, have been tinted or are treated with coatings. A good example of this is something called "birefringement," which appears when taking a polarized photo through an airplane window:

above birefringement example courtesy of eaghra (but in a modified form)
CONTRAST & GLARE
Since polarizers reduce direct reflections, this often has the consequence of also reducing image contrast. This can make it easier to capture scenes with a broad dynamic range, such as trying to balance a bright sky with relatively unreflective land (which can even make using a graduated neutral density filter or high dynamic range less important).
However, less glare/contrast is sometimes undesirable. In the example below, the artistic intent was to (literally) highlight the curving road by portraying it in stark contrast to its surroundings. Using a polarizer actually detracted from this goal:


entrance to Canyonlands Island in the Sky National Park - Utah, USA
On the other hand, in most other situations a decrease in glare is desirable and generally creates a more pleasing photo. For instance, in the above example the light doesn't appear as harsh and reflective on the rocks to the far right.
In other situations polarizers can instead increase contrast. In the next example, the polarizer increased contrast by filtering the light reflecting off of the haze and sea spray. This effect appears most pronounced in the hills and the puffy clouds directly overhead:
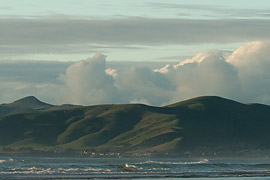
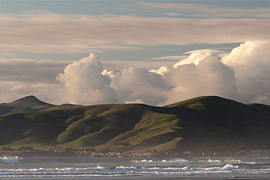
above examples are courtesy of mikebaird (but in a modified form)
In general, using a polarizer on clouds and skies will almost always increase contrast, but if the subject itself is highly relfective then a polarizer will instead likely decrease cotrast.
DISADVANTAGES
While polarizing filters are clearly very useful, their disadvantages are that:
- They can make the exposure require 2-3 stops (4-8X) more light than normal.
- They are one of the most expensive types of filters.
- They require the camera to be pointed at a right angle to the sun for maximal effect.
- They can take longer to compose with since they need to be rotated.
- They can be difficult to visualize when using the camera's viewfinder.
- They can potentially reduce image quality if the filter isn't kept perfectly clean.
- They cannot ordinarily be used with stitched panoramic photos or wide angle shots.
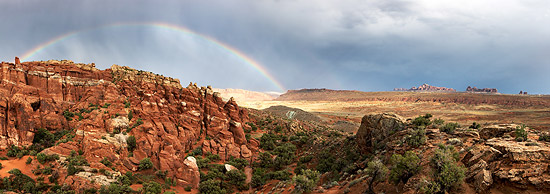
The above panorama would have appeared uneven with a polarizer, and the rainbow could have even disappeared at some positions. Photo from Arches National Park - Utah, USA.
Furthermore, sometimes reflections are essential to a photograph. Two key examples include sunsets and rainbows*; use a polarizer on either and the colorful, reflected light may disappear if the polarizer is rotated for maximum effect.
*Note: polarizers can sometimes enhance the color and contrast of a rainbow by darkening background clouds, but only if the filter has been rotated just right. Furthermore, including both ends of a rainbow usually requires a wide angle lens, in which case the scene/rainbow may appear uneven.
OTHER TIPS & FURTHER READING
- Substitute Neutral Density Filter. A polarizing filter can sometimes be used when a longer exposure is needed. This can enable an exposure time which is 2-3 stops (4-8X) longer than otherwise possible, which is often sufficient for shots of water/waterfalls.
- Pre-Visualize Using Polarized Sunglasses. Wearing untinted polarized sunglasses can be a helpful way to pre-visualize how your scene will be captured in a photograph. Just be sure to take these off though when looking through the camera's viewfinder, since the combined effect can prevent you from being able to see the image.
- Thin Filters on Wide Angle Lenses. A polarizer can sometimes create visible darkening in the corners of the image ("vignetting") when used on a wide angle lens. To avoid this, you'll likely need to opt for the more expensive "thin" variety.
- Circular vs. Linear Polarizers. The circular polarizing variety is designed so that the camera's metering and autofocus systems can still function. Linear polarizers are much less expensive, but cannot be used with most digital SLR cameras (since these use through-the-lens (TTL) metering and phase detection autofocus).
For further reading on this topic, also see:
- Understanding and Choosing a Camera Lens Filter: Polarizers, UV, ND & GND.
This is a broad overview of all the different filter options available to photographers.


