
 Helpful Posts:
 Nice work Geoff. You have caught the walkers clearly even shooting through the mist! Did you use a tripod? I must learn this technique!
Results 61 to 80 of 100
-
20th August 2016, 10:54 AM #61


- Join Date
- Sep 2014
- Location
- Ontario, Canada
- Posts
- 2,420
- Real Name
- Joe
Re: 2016 Project 52 Challenge 3rd Quarter by Geoff F
-
20th August 2016, 07:14 PM #62
- Join Date
- Jan 2009
- Location
- South Devon, UK
- Posts
- 14,421
Re: 2016 Project 52 Challenge 3rd Quarter by Geoff F
Yes shot with a tripod and as Bruce mentioned I edited out the walkers from one of the images before doing the merge. This sort of scene can sometimes work as a focus stack providing there isn't too much movement or a hard division between the two at the point of merging. It doesn't always work but is worth a try when simpler options are obviously lacking in what they can offer.
Shooting for a two image stack is often worth trying for 'real life' insect shots as well providing there isn't any subject movement. A little bit of wind caused misalignment can still be brought together. And even when there is too much movement for a direct merge I sometimes manage to take a wing or leg etc from one shot then copy and paste it into the other.
Birds can be more tricky but I do occasionally copy and paste to move widely spaced individuals into a better grouping when the background is similar or even move a bird from one shot into the next.
The main thing I have found from these Project 52 Challenges, John, is to always think ahead and have some alternatives lined up for when the weather or other commitments interfere with your best laid plans.
ps. With the looking out to sea scene, I suspect that ship is one of the cable layers from the nearby port of Plymouth.
-
20th August 2016, 07:32 PM #63

- Join Date
- May 2012
- Location
- Canada (west coast)
- Posts
- 2,021
- Real Name
- Bruce
Re: 2016 Project 52 Challenge 3rd Quarter by Geoff F
Geoff, thanks for the detailed comments about two image focus stacks. I was intrigued by your reference to a cable laying ship since it was comparatively so close to shore (compared to deep sea cable laying before the days of satellites). Or perhaps the ship is simply returning to or leaving port?
-
20th August 2016, 07:47 PM #64
- Join Date
- Jan 2009
- Location
- South Devon, UK
- Posts
- 14,421
Re: 2016 Project 52 Challenge 3rd Quarter by Geoff F
Yes Bruce, that ship is on passage.
If you look at the GPS information from my recent butterfly shot at the same location and date you will see that Plymouth is about 10 miles to the north west.
http://i65.tinypic.com/w85max.jpg
At one time there were cables landed to this part of the coast and there has been quite a bit of new cable laying just to the east of this spot over the past few years as it was soon realised that satellites would be unable to cope with the expected increase of traffic due to more internet use as well as a general need for more communication.Last edited by Geoff F; 20th August 2016 at 07:54 PM.
-
21st August 2016, 12:52 AM #65

- Join Date
- Dec 2009
- Location
- WNY
- Posts
- 36,717
- Real Name
- John
Re: 2016 Project 52 Challenge 3rd Quarter by Geoff F
Geoff, Originally Posted by Geoff F

Sounds like a good strategy, I find that pre-planning only works on solo adventures, having an entourage can dampen your enthusiasm.")
-
25th August 2016, 06:54 PM #66
- Join Date
- Jan 2009
- Location
- South Devon, UK
- Posts
- 14,421
Re: 2016 Project 52 Challenge 3rd Quarter by Geoff F
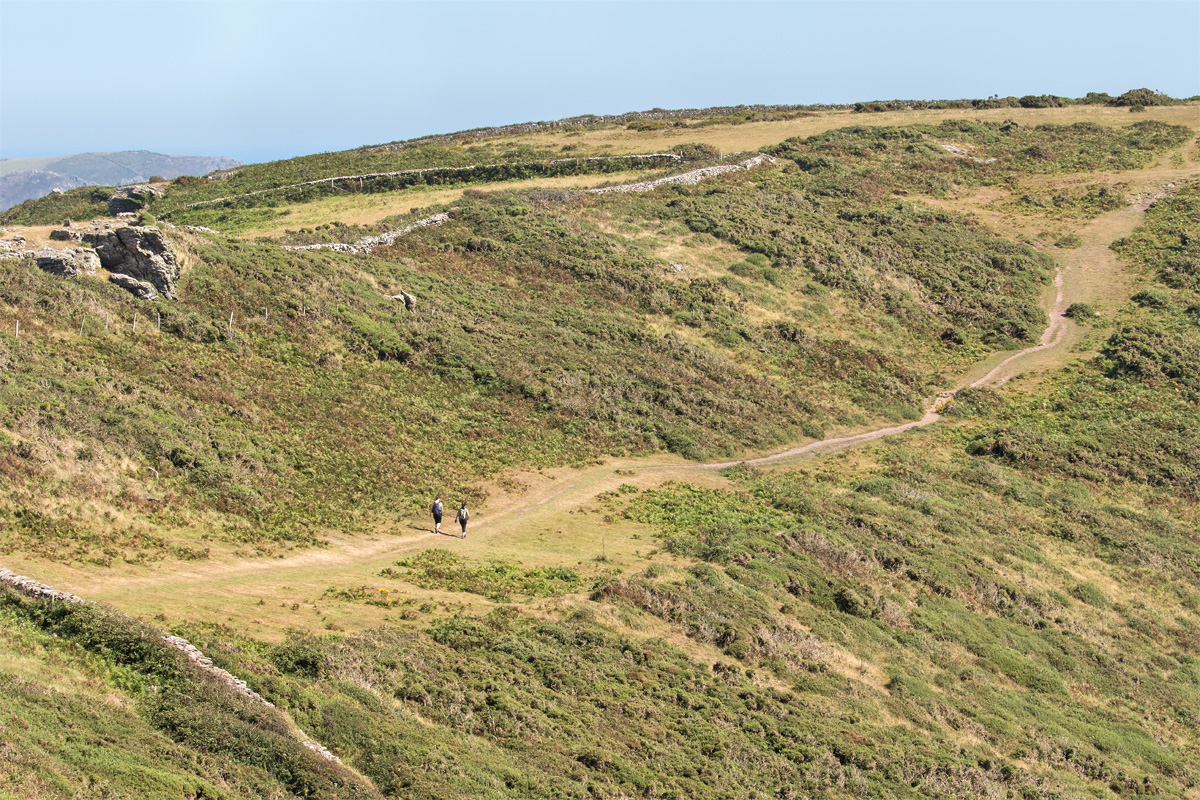
I was returning from an insect hunt when I took a slight detour along the coast path. The light was a bit on the harsh side, but anyway, I had a go at including some cliff path walkers with the landscape. They are all merges of two different edits from a Raw file.
Looking down the valley.

7D with Canon 70-200. 1/400 F11 Iso 200.
Anvil Rock. So called because when seen from the sea this cliff top rock appears anvil shaped. My first shot of this scene was angled slightly to the left with the walkers entering the scene from that side; but I thought they appeared over dominant so waited until they were exiting the area through a gate.

A similar situation with this group but in this case I tried letting them walk a little further along to concentrate more on the path instead of a seascape type of scene.
-
25th August 2016, 08:13 PM #67
- Join Date
- Jan 2009
- Location
- South Devon, UK
- Posts
- 14,421
Re: 2016 Project 52 Challenge 3rd Quarter by Geoff F
On reflection, with the first scene, I think I should have included just a little more of the left side and less from the right. But it was a quick shot where I was more interested in getting that group of walkers at the best spot for distance. I have already cropped a little from the right side and don't want to lose anything more from top or bottom.
-
25th August 2016, 10:22 PM #68
- Join Date
- Dec 2009
- Location
- WNY
- Posts
- 36,717
- Real Name
- John
Re: 2016 Project 52 Challenge 3rd Quarter by Geoff F
Nice series, I like how you exposed for the midtones and let the shadows maintain detail.
-
26th August 2016, 07:41 PM #69
- Join Date
- Jan 2009
- Location
- South Devon, UK
- Posts
- 14,421
Re: 2016 Project 52 Challenge 3rd Quarter by Geoff F
That is the trick of merging two different conversions from the same Raw file, John. Shoot for the midtones then stretch a little either way during initial conversion.
-
27th August 2016, 11:55 AM #70
- Join Date
- Sep 2014
- Location
- Ontario, Canada
- Posts
- 2,420
- Real Name
- Joe
Re: 2016 Project 52 Challenge 3rd Quarter by Geoff F
Could you please expand a little on this Geoff? Originally Posted by Geoff F
Love the textures you have captured here!
-
27th August 2016, 12:09 PM #71
- Join Date
- Dec 2009
- Location
- WNY
- Posts
- 36,717
- Real Name
- John
Re: 2016 Project 52 Challenge 3rd Quarter by Geoff F
Definitely needed for the time of day, usually the shadows would have to go black to get those midtones. Originally Posted by Geoff F
-
27th August 2016, 07:13 PM #72
- Join Date
- Jan 2009
- Location
- South Devon, UK
- Posts
- 14,421
Re: 2016 Project 52 Challenge 3rd Quarter by Geoff F
It is a way of creating a HDR effect when true HDR shooting is impossible to use. For example, handheld shots of moving subjects. Originally Posted by joebranko
Choose a camera setting for the midtones which avoid over exposed highlights or excessively dark shadows. Usually some exposure compensation is needed to get the best starting point.
In the Raw image converter (I use ACR) create a conversion for bright midtones. It doesn't matter if the highlights over expose or the shadows are on the bright side. Save this image as a copy.
Return to the original Raw shot and do a darkened version so the shadows are dark but not clipped so sufficient detail remains and the highlights have returned to an acceptable brightness. Save as a copy. You can make as many versions as you like but hand merging can become a bit confusing if you have too many layers.
Open both versions as layers. Decide which one will be the background image and which one to merge. Add a mask and edit by brushing in the normal way to show the areas required from that layer. Just the same as happens with auto HDR but using a manually edited mask. In fact when shooting true HDR shots I still manually edit the masks because I have never found any HDR auto merging software which I really like. Sometimes you will see this technique mentioned as 'Hand Made HDR'.
In reality, using Adobe CC it is easier to use Smart Objects. Open the first conversion as a Smart Object. Right click on the Smart Object name in the pop up layers workflow box and select Make a Copy from the drop down options. Double click on the thumbnail image will return you to ACR where you simply make any changes then send the image back to the main work window.
You can keep moving either Smart Object (original or copy) in and out of ACR for more tweaks as many times as you wish. And of course you can create as many Smart Object copies as you wish from the original. Although I tend to find three are normally sufficient and in many cases two layers are all that will be needed.
Warning. I'm trying to describe this process from memory so I may have got something slightly wrong.
-
28th August 2016, 03:46 AM #73

- Join Date
- Aug 2012
- Location
- Kerala, India
- Posts
- 13,862
- Real Name
- Nandakumar
Re: 2016 Project 52 Challenge 3rd Quarter by Geoff F
Nice images there

-
1st September 2016, 08:21 PM #74
- Join Date
- Jan 2009
- Location
- South Devon, UK
- Posts
- 14,421
Re: 2016 Project 52 Challenge 3rd Quarter by Geoff F
Thanks Nandakumar
-
1st September 2016, 08:25 PM #75
- Join Date
- Jan 2009
- Location
- South Devon, UK
- Posts
- 14,421
Re: 2016 Project 52 Challenge 3rd Quarter by Geoff F
Week 35 - Keeping Cool
A scene which amused me. Merge of two exposures.

7D with Tamron 24-70 lens 1/500 F11 Iso 400
-
1st September 2016, 08:56 PM #76
- Join Date
- May 2012
- Location
- Canada (west coast)
- Posts
- 2,021
- Real Name
- Bruce
Re: 2016 Project 52 Challenge 3rd Quarter by Geoff F
Geoff, the sheep blend in well! If I counted correctly, there are seven visible?
-
2nd September 2016, 02:21 AM #77
- Join Date
- Aug 2012
- Location
- Kerala, India
- Posts
- 13,862
- Real Name
- Nandakumar
Re: 2016 Project 52 Challenge 3rd Quarter by Geoff F
very lovely shot
-
6th September 2016, 06:29 AM #78

- Join Date
- Jun 2013
- Location
- Peel Region of Western Australia
- Posts
- 206
- Real Name
- Lindsay
Re: 2016 Project 52 Challenge 3rd Quarter by Geoff F
I really like your coastal shots, beautiful rugged coast line where you live. Very effective use of the different lines in your shots, pathways, fences, walls and hill tops. Makes me feel like I am actually standing there in Devon. Perfect focus and DoF.
-
6th September 2016, 06:33 AM #79
- Join Date
- Jun 2013
- Location
- Peel Region of Western Australia
- Posts
- 206
- Real Name
- Lindsay
Re: 2016 Project 52 Challenge 3rd Quarter by Geoff F
Very effective, Geoff, tricky exposure without the merge. Must be still very warm over at your place. Knarly old tree on right, do you know what it is? I can't even remember the names of our local trees.
-
6th September 2016, 07:58 PM #80
- Join Date
- Jan 2009
- Location
- South Devon, UK
- Posts
- 14,421
Re: 2016 Project 52 Challenge 3rd Quarter by Geoff F
Thanks for the comments. Yes, Bruce 7 sheep including the one on its own on top of the hedge.
There is an even more gnarled tree which is just out of the scene on the right. I didn't really notice the species but there are a few oak trees scattered around there. At the damp wildlife site from where I was shooting it is mostly willow. I did find a patch of Green Oak Fungus there, but it will also grow on other wood.

 Reply With Quote