
 Helpful Posts:
 Maybe I'm simply misinterpreting that document, Ted, but my take is that Levels refers to the name of the tool and that tool can be used to set (change), among other things, a black point and a white point.
If there is truly only one black point and only one white point, why do so many people so often write about changing the black and white points? There is a point that if I call a very dark wall black even though it is not the blackest of blacks, it's not helpful to describe it as something other than black. That's because the term, black, itself explicitly refers to a range of tones, not one particular tone. So, it's intuitive to me that a black point can be any of the points that are in a range of points almost everyone would describe as black.
Again, it would be helpful to see the definition of black point explicitly provided by a standards body or any organization such as Adobe attempting to develop a de facto standard.
Results 21 to 40 of 45
Thread: Limits of Exposure Composition
-
21st April 2016, 08:47 PM #21

- Join Date
- May 2012
- Location
- northern Virginia suburb of Washington, DC
- Posts
- 19,064
Re: Limits of Exposure Composition
-
21st April 2016, 09:06 PM #22Moderator

- Join Date
- Mar 2012
- Location
- Ottawa, Canada
- Posts
- 21,947
- Real Name
- Manfred Mueller
Re: Limits of Exposure Composition
Brian - the presence or absence of pure black or pure white values in an image are actually irrelevant here as we are discussing editing these images. What you are examining the colours that are in the image, rather than what they ought to be. Originally Posted by Saorsa

The first thing I always fix is the colour cast, if the image has one. I them check the absolute values of what the colours should be.
If I see a substantial element in the image that is black (like car tires) and yet they appear to be gray, I'll set them to black (or at least a very, very dark gray). The same thing goes if there is a substantial element in the image that is white, but shows up as a light gray, I'll force it to be closer to white, if not being white (it could be the white car with those black tires). I generally try to have images that have a broad luminance range as these generally look better.
-
21st April 2016, 09:14 PM #23

- Join Date
- May 2011
- Location
- Brisbane Australia
- Posts
- 4,636
- Real Name
- Dave Ellis
Re: Limits of Exposure Composition
Mike Originally Posted by Mike Buckley
This reference to Adobe's specification for their DNG standard may be helpful. In particular section 4 defines Black and White Level tags.
"BlackLevel
Description
This tag specifies the zero light (a.k.a. thermal black or black current) encoding level, as a
repeating pattern"
"White Level
Description
This tag specifies the fully saturated encoding level for the raw sample values. Saturation is
caused either by the sensor itself becoming highly non-linear in response, or by the camera's
analog to digital converter clipping."
These Black and White Levels are set when processing the RAW file. The range of values between them are then mapped into a range of 0-255 (8 bit) or 0-65535 (16 bit). These reference points relate to the characteristics of the camera, not the scene.
Processing software tools such as "Levels" allow you to shift these points, according to the nature of your scene. For example if you shift the Black Point/Level slider up to 10, all pixels in the image with values between 0 and 10 will become 0 and pixels with higher values than 10 will be have their values re-scaled.
Hope this of some use.
DaveLast edited by dje; 21st April 2016 at 09:22 PM.
-
21st April 2016, 09:24 PM #24
- Join Date
- May 2012
- Location
- northern Virginia suburb of Washington, DC
- Posts
- 19,064
Re: Limits of Exposure Composition
That is helpful, Dave. However, that document seems to me to be defining black level as what others are calling a black point. That's in contrast (no pun intended) to earlier assertions in the thread at least as I understand them that levels and points are different.
It's really sad that the industry hasn't taken the time to define this stuff in lay terms that any reasonably intelligent person can understand. My inner conspiracy theorist makes me wonder if everything is intentionally left vague so lots of people can charge for tutorial videos and live sessions with no concern whatsoever for the contradictions that abound among them.Last edited by Mike Buckley; 21st April 2016 at 09:53 PM.
-
21st April 2016, 09:36 PM #25
- Join Date
- May 2011
- Location
- Brisbane Australia
- Posts
- 4,636
- Real Name
- Dave Ellis
Re: Limits of Exposure Composition
Mike I'm not as pedantic as some Originally Posted by Mike Buckley
 and consider the terms level and point to be interchangeable in this context.
I agree that the lack of clarity of terminology is a real curse and can lead to a lot of fruitless discussion and argument. We'll always have to live with it though.
Dave
-
21st April 2016, 09:56 PM #26Moderator
- Join Date
- Mar 2012
- Location
- Ottawa, Canada
- Posts
- 21,947
- Real Name
- Manfred Mueller
Re: Limits of Exposure Composition
Mike - the black point is nothing more than what you define it to be. Same with the white point. Originally Posted by Mike Buckley
I don't like explaining this with the ACR or Lightroom Blacks, Whites, Shadows or Highlight sliders and they don't do a particularly good job in letting the user / editor visualize what this is about. I find that the Photoshop Levels tool (RGB) makes a lot more sense. Let's look at this image:
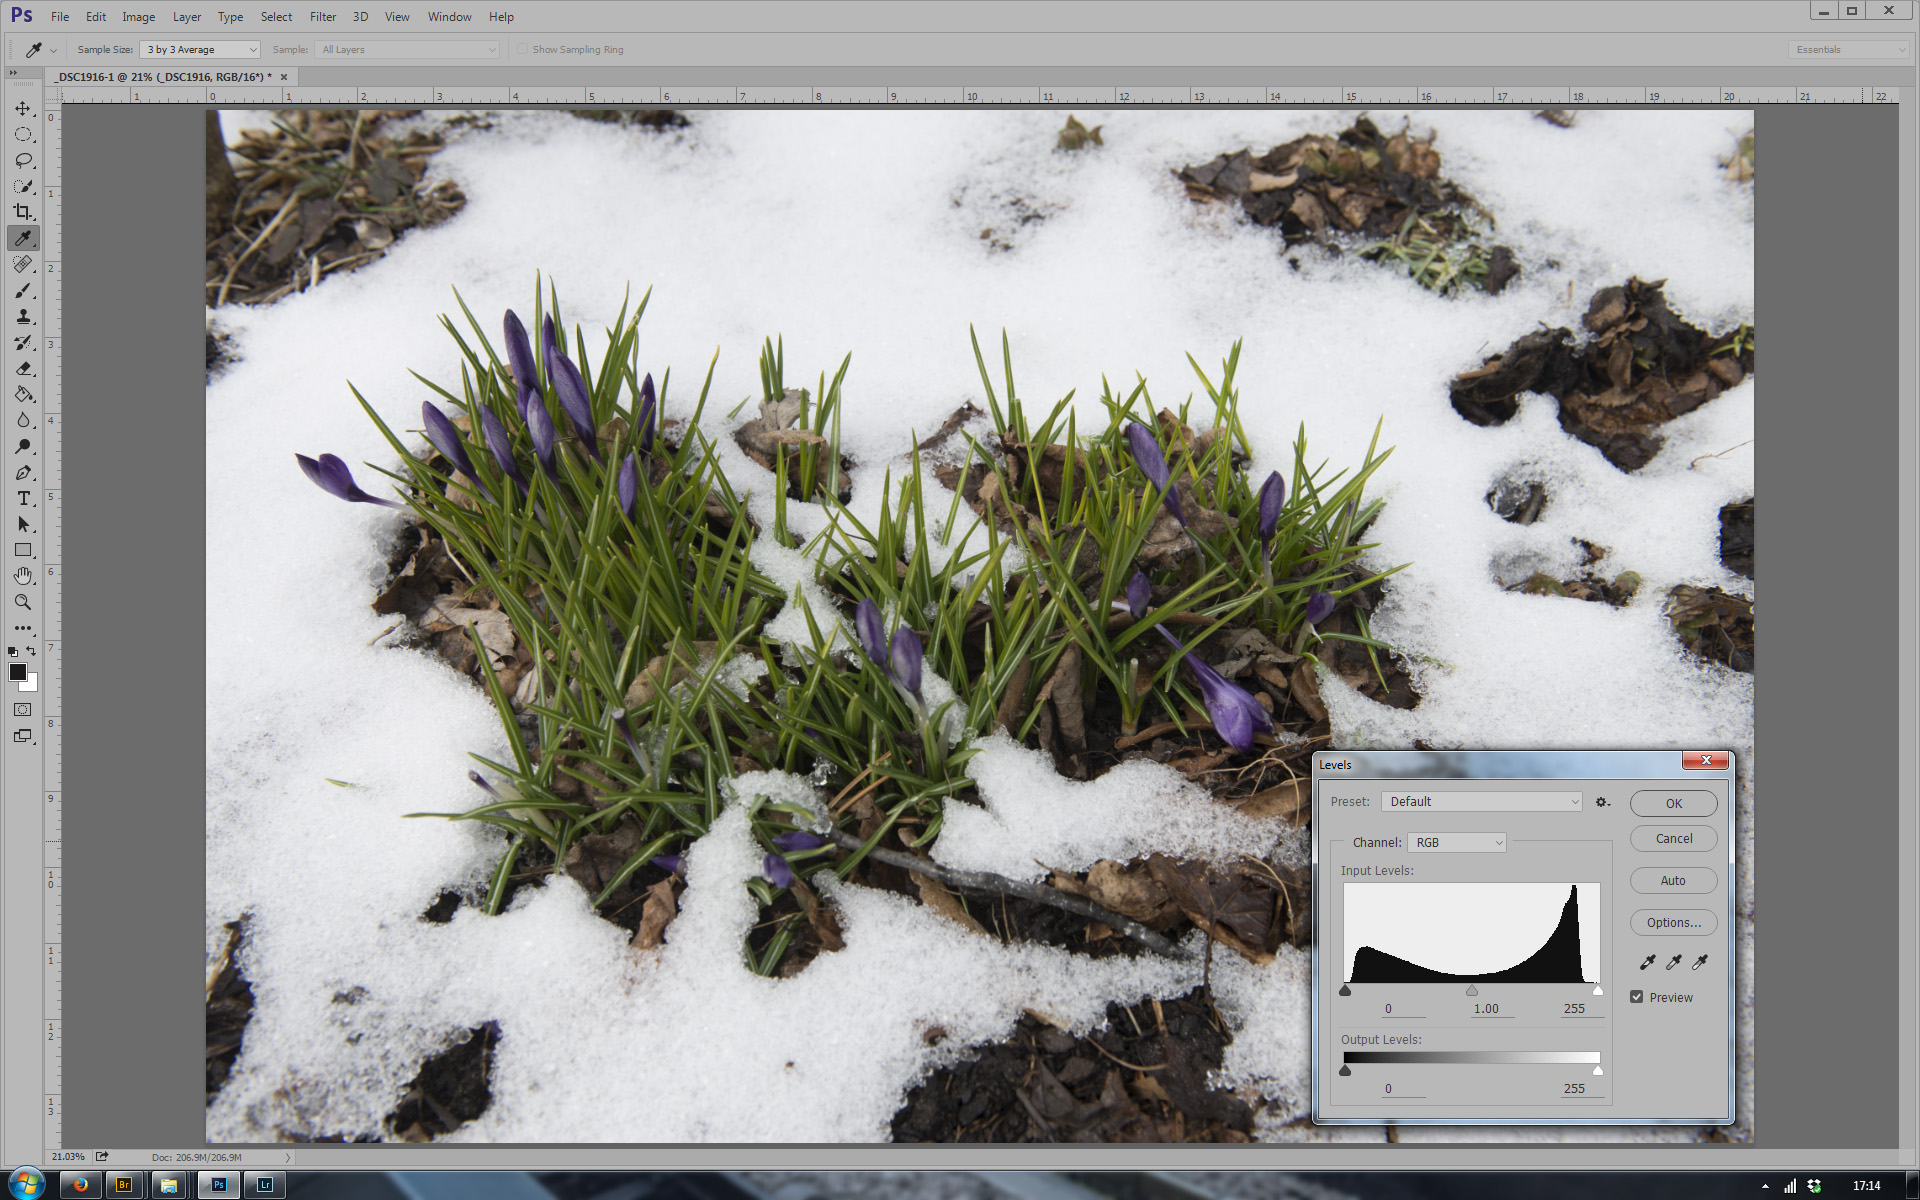
If you look at the histogram, I don't have significant amounts of data at the extreme left or extreme right, so I know that I have not clipped the blacks or white values. I know that snow is white, but my histogram suggests otherwise, as I am showing no substantial highlights with values above 238. That is light gray, not white.
On the other hand, I'm pretty sure that some of those little buried dark areas are quite likely black, but the lowest substantial area of black I can see has a value of 7; so again, close to pure black, but in reality dark gray.
If I move the black slider slightly to the right, to the point where the histogram shows a steep rise (value of 7 on the scale), I will have set my black point and any values to the left of the slider will all be assigned values of black. This is what is referred to as "setting the black point".
The same thing will occur on the right hand side. If I move the right hand slider to 238. the point where the histogram ramps up steeply, anything to the left will be assigned as white. Here I will have set the white point.

If you look at the histogram carefully, you will note that there is a tiny bit of data to the left of the black point and a tiny bit of data to the right point. If you have every heard the expression "crushing the shadow detail" or "crushing the whites" and "crushing the highlights" or "crushing the whites", this is exactly what I am doing here. Those little bits are going to all be assigned values of pure black and pure white.
This is what the histogram of the reworked image looks like. The luminance values now go from 0 to 255, and I have a full tonal range in the image.
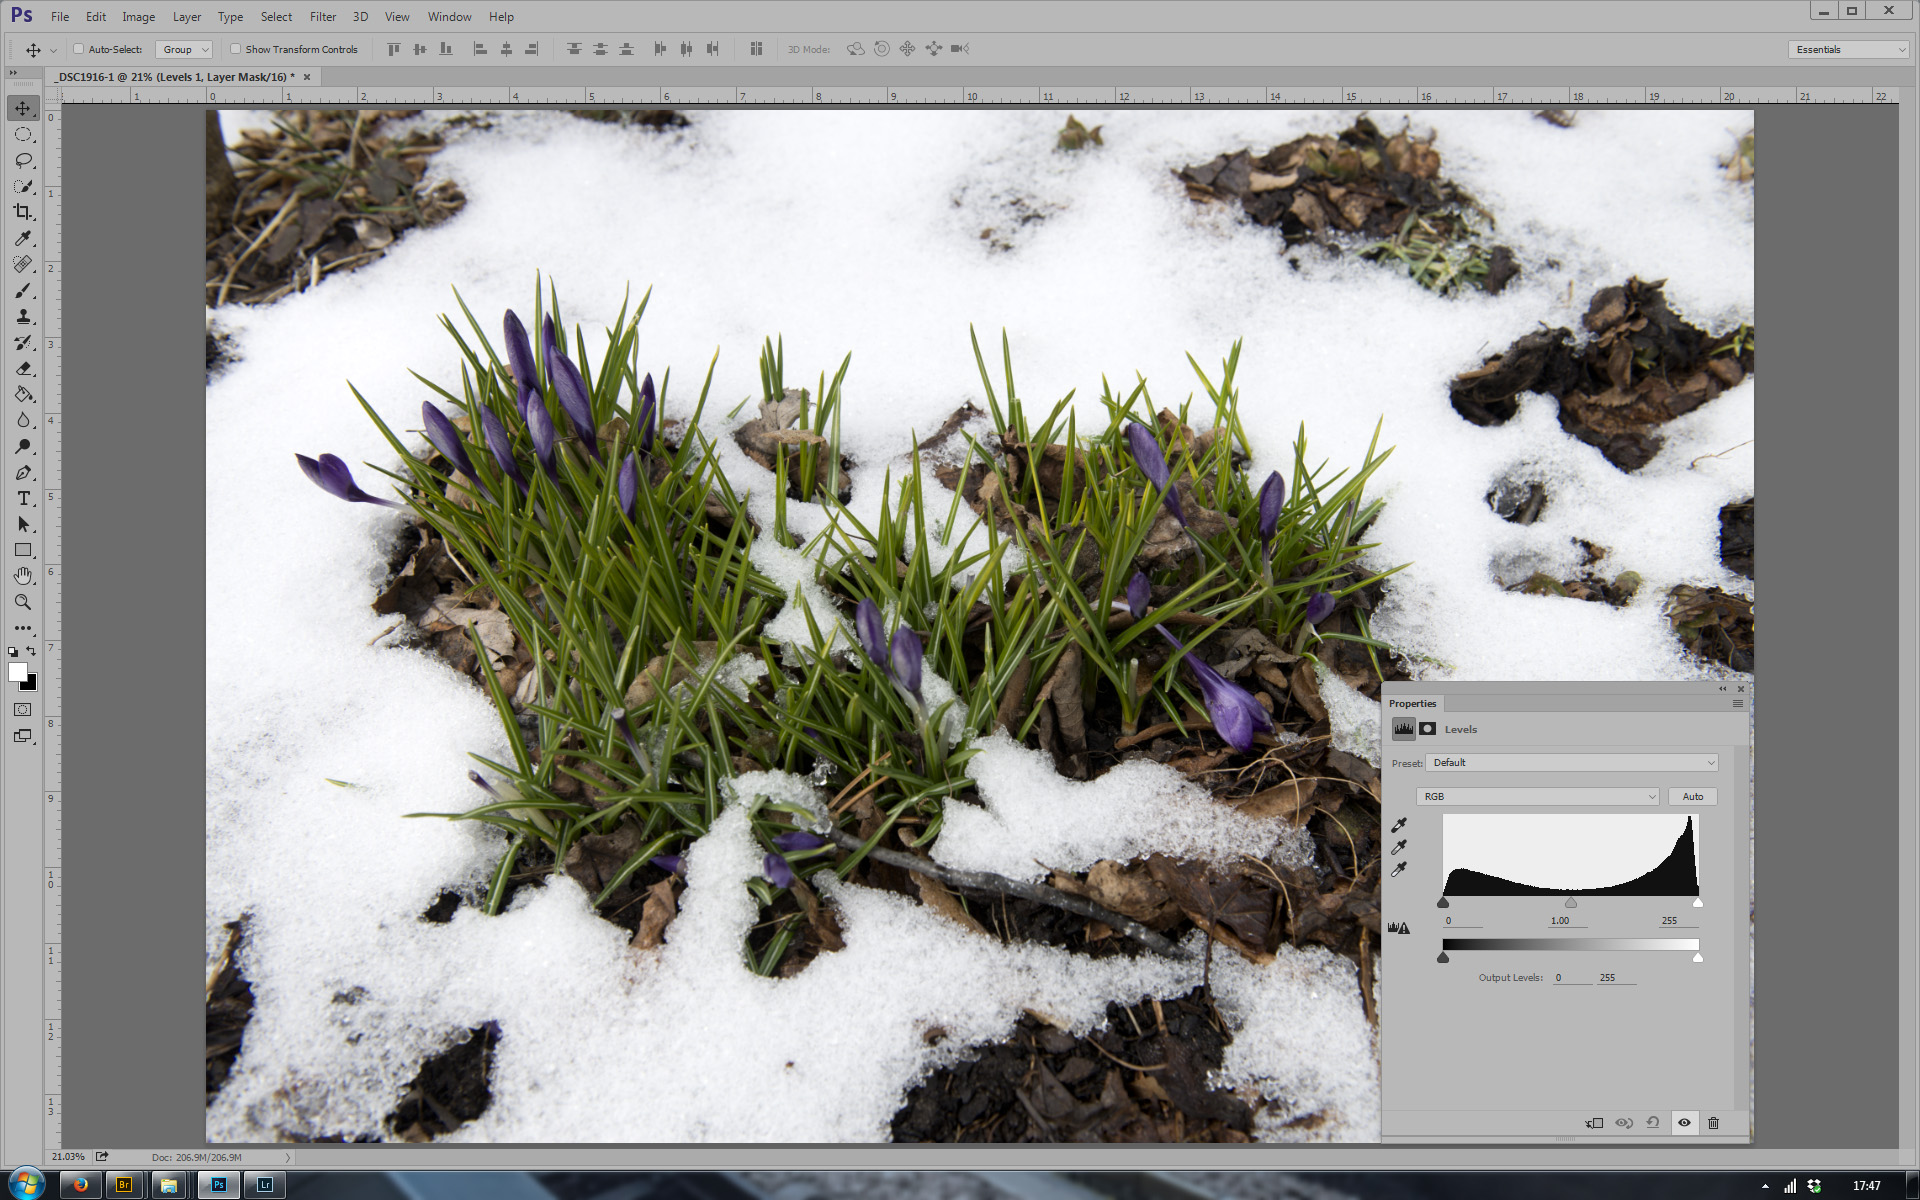
If you look very carefully on the left hand side of the histogram and the right hand side of the histogram, you are going to see a number of pixels do have 0 value (i.e. black) and an even larger number have a value of 255 (i.e. white) and you are going to jump all over me and tell me I've got blown shadow detail and blown highlights and I shouldn't ever do that.
And that would be wrong. That recommendation is 100% correct when you take an image. You don't want to lose that data in capture. When you are creating an image, it is actually a good thing to see this. You will have a far cleaner (in my view better) image.
To me, the only time that the terms black point and white point make sense, are when discussing where the sliders were positioned in the second image.
Note: The graphs in the first image is slightly different than the ones in the second and third image. The first image shows what the Photoshop levels tool does and the other two images show the tool used when I use adjustment layers, rather than than <Image> <Adjsutments> <Levels>.
-
21st April 2016, 10:15 PM #27
- Join Date
- May 2012
- Location
- northern Virginia suburb of Washington, DC
- Posts
- 19,064
Re: Limits of Exposure Composition
My point of attempting to clarify the terminology was simply to help the OP understand and communicate effectively with others and vice versa about the tones in his images. I'd like to end my participation in the discussion by offering the following summary of the only stuff that I consider really important:- Most images presented in a traditional style can be improved by attending to the darkest tone, the brightest tone and the overall brightness and contrast of the mid-tones.
- There are many tools that can be used to attend to the characteristics mentioned above. Some image-editing programs offer a certain kind of tool for attending to them and others offer multiple kinds of tools.
Notice that all of that can be explained without using the terms levels, black point or white point, which clearly mean different things to different people and understandably so.
-
21st April 2016, 10:35 PM #28Moderator
- Join Date
- Mar 2012
- Location
- Ottawa, Canada
- Posts
- 21,947
- Real Name
- Manfred Mueller
Re: Limits of Exposure Composition
Good summary Mike. The terminology and tools are less important than results. Originally Posted by Mike Buckley
Unfortunately, the terminology police has not done a particularly good job in the photography business.
"Conventions" that everyone one is taught are pervasive in the professions (medicine, law, engineering) and in the physical sciences (physics, chemistry, biology) and of course in mathematics. This is somewhat less true or not true at all in other fields.
Many of the photographic terms do have their roots in the physical sciences, but very few photographers are scientists, so the resulting mayhem is something we have should have been anticipated.
Last edited by Manfred M; 21st April 2016 at 11:27 PM.
-
26th April 2016, 07:20 AM #29New Member
- Join Date
- Apr 2016
- Posts
- 5
Re: Limits of Exposure Composition
It just needs a Levels adjustment of the black and white point to stretch out the tone range, together with a contrast increase. You mentioned that the image has no black and white points. Every image has black and white points. It's a matter of changing them when desired, which is the case everyone is explaining about this one.
-
26th April 2016, 12:24 PM #30
- Join Date
- Feb 2012
- Location
- Texas
- Posts
- 6,956
- Real Name
- Ted
Re: Limits of Exposure Composition
Thanks for the example. Originally Posted by GrumpyDiver
In Levels and saying for the moment that the upper left/right sliders are setting the black and white points of the image, how should we refer to the lower left/right sliders? We all know what they do, of course, but what do we or Adobe call them? Does anybody use them or are they always left at their extremes?
On a more general note, I find that the shape of the histogram quite important when deciding where to place the sliders. For example the shape where the lighter part of the curve is concave and shows counts between mid-to-light gray but not many counts at each mid-to-light gray level. Then, for some images but not all, it is possible to move the upper right slider quite a bit to the left without losing significant detail.
I find a logarithmic setting for counts quite useful in that regard. Not all histograms have that option, though.Last edited by xpatUSA; 26th April 2016 at 01:28 PM.
-
26th April 2016, 01:31 PM #31

- Join Date
- Dec 2013
- Location
- Florida USA/Dunstable Beds.
- Posts
- 1,435
- Real Name
- Brian Grant
Re: Limits of Exposure Composition
I don't think that is true. you are not changing the black and white points when you move the sliders. You are spreading the histogram and you are limited to how far you can spread it. You are also expanding the range of all of the color values. Picking a black and white point within the image is not the same thing. It does not expand the range it actually clips a lot of values. Here is an example. Originally Posted by Skugphotography
I posted this image in the insect thread.
While processing it I didn't use the black and white points contrast and brightness seemed to do the job for a web posting. But here I will process it differently. I picked two almost black and almost white sets to show the difference.
Here is the result of only using the first set.
Obviously not successful in that much of the darker areas, regardless of color values have become black or much darker.
Here is the result using the second set which were much more carefully selected.
Now that I look at it, I actually like the greater detail in the are between the insects a lot better with just the black point/white point selection.
-
26th April 2016, 03:09 PM #32Moderator
- Join Date
- Mar 2012
- Location
- Ottawa, Canada
- Posts
- 21,947
- Real Name
- Manfred Mueller
Re: Limits of Exposure Composition
Ted - these are the "output sliders" and I use them all the time when printing. They are used to map the black point and white point for output. With these sliders in their default positions (again sticking with 8-bit values), the blacks are mapped to 0 on the output device and the whites are mapped to 255. This is fine for computer screens, but when you are preparing the images to be printed, we also have to be concerned about how the images come out in print. I'm going to stick with inkjet photo printing, as I know very little about offset press work or some of the more obscure photo printers like dye tranfer. When I refer to printer in the rest of this post, I am strictly referring to inkjet printers Originally Posted by xpatUSA
Even though a lot of printers suggest that they are RGB devices, a quick look at the ink cartridges quickly show that this is not true. I have yet to see red, blue and green cartridges, but even the most basic printers have four "colours", yellow, magenta, cyan and black. My understanding is that this is how the AdobeRGB colour space came about - mapping the CMYK colours to RGB ones. My understanding is that modern photo printers with additional colour cartridges above the basis four exceed what basic CMYK colours can produced. I've seen some of the higher end printers using up to 12 different cartridges (my Epson 3880 uses 9 different "colour" cartridges). Unfortunately, there is little to no data out there on the absolute performance or impact out there. Looking at prints made on 4, 9 and 12 cartridge printers using the same paper does show that a wider and more vivid colours, but that's hardly a technical answer.
Colour printers have two ways of creating colours - mixing colours of inks and varying the dot size. Lower end printers tend to have a single dot size, while higher end ones can produce more than one dot size. The bottom line is that while printers can output a broader range of colours (wider gamut), they can reproduce far fewer individual shades than our colour screens. I found an article I've lost the link to (unfortunately) that colour ink jet printers can reproduce from around 250,000 to around 700,000 unique shades, depending on the specific printer model.
This brings up why we need the output sliders. Some math I saw (again, lost the links during a hard drive failure) suggested that any value below (12, 12, 12) would print as pure black, so it is common practice to set the output slider to a value of around 15 to ensure that black areas of the print show shadow detail, as we get into the range where the printer will show subtle shadow detail in these very dark areas. The "expert" opinion (i.e. practical experience rather than analysis) during a colour correction course I took last year at the local community college suggested the black output point = 15 and white output point of 240, based on some testing the prof had done on an Epson 4900 printer.
We have a similar by slightly different problem at the other end. Again we have a similar issue that any values above 243 are mapped to a pure white value by the printer driver. As prints rely on the media to produce whites (I can't recall ever seeing a printer with a white ink cartridge), so the whitest colour we can get is the colour of the paper we are printing on. Whites are even more problematic than blacks because depositing ink changes the reflectivity of the paper. If you have a print with specular highlights or blown out areas (bright light source), these areas will not have any ink and if you look at your print from a bit of an angle you will see these bare spots with no ink on them, and they can really detract from the look of the final product. The solution is similar to what is done with the black output value; setting it to around 240 ensures a bit of ink will be deposited and the bare spot problem goes away.
So, just to recap, when I print from Photoshop, (after doing all of the other post-processing work), I will set the back output slider in the 12 - 15 range and the white output slider in the 240 - 243 range to prevent these issues.Last edited by Manfred M; 26th April 2016 at 03:53 PM.
-
26th April 2016, 06:35 PM #33
- Join Date
- May 2011
- Location
- Brisbane Australia
- Posts
- 4,636
- Real Name
- Dave Ellis
Re: Limits of Exposure Composition
Interesting Manfred, I've never been able to think of a reason for using the output sliders. Now I have one!
Dave
-
26th April 2016, 07:59 PM #34
- Join Date
- May 2011
- Location
- Brisbane Australia
- Posts
- 4,636
- Real Name
- Dave Ellis
Re: Limits of Exposure Composition
Brian I believe the Levels adjustment in PS works in the following way: Originally Posted by Saorsa
If you move the right hand slider (white level) from 255 down to say 220, any pixel with an R G or B value equal to or greater than 220 will have that R,G or B value increased to 255. eg If a pixel has RGB values of say 220, 200,190, then it's R value will be increased to 255 and it's G and B values will be increased in such a proportion as to keep the Hue unchanged. ie the G and B values will not be increased as far as 255.
In addition, all pixels will have their values scaled up relative to the new white level.
Similarly for the Black level slider. The mid-point slider changes the gamma.
If you use the White Point Eyedropper, it will change the values of the pixel you select with it to 255,255,255 and other pixel values will be scaled accordingly. Similarly with the Black Point (0,0,0) and Grey point eyedroppers (204,204,204 on a gamma encoded image). This has the effect of not only changing the range of tones but also can change the Hue if the pixel you select has unequal values of R,G and B to start with.
I guess we need to be careful with terminology when talking about white points and white levels, as Ted suggested originally!
DaveLast edited by dje; 26th April 2016 at 10:16 PM.
-
26th April 2016, 11:44 PM #35
- Join Date
- Dec 2013
- Location
- Florida USA/Dunstable Beds.
- Posts
- 1,435
- Real Name
- Brian Grant
Re: Limits of Exposure Composition
When I talk about a black or white point, I mean a point. One pixel, the minimum measure. To find it I zoom in until pixelation makes it obvious. The effect of that point is used to process across the entire image. The end sliders clip the histogram and make all point outside black or white. The points can actually force a redistribution of values. If you use them on a strongly under or overexposed image you will actually see a 'picket fence' effect where some values have few if any counts in the histogram.
If I open the images I posted in FastStone I can open the historgram on one and click back and forth. The histograms are entirely different. That doesn't seem to be the case when I use the sliders to force the ends of the graph.
-
27th April 2016, 11:49 AM #36

- Join Date
- Dec 2011
- Location
- New England
- Posts
- 8,631
- Real Name
- Dan
Limits of Exposure Composition
The more I think about this, the more I think the terminology is fine, including the use of "point" and "level."
I'll stick with just the black point because it is less typing to reference only one of the pair.
The black point is the point on the x-axis of the histogram at which the level of any pixel is 0,0,0. Initially, this is at the extremes of the histogram display. If the histogram does not reach to the left edge, then there are no pixels at that value. If you move the black point indicator to the right, you are simply rescaling the histogram, mapping the displayed histogram to a new one. Suppose, for example, that the lowest value in the observed histogram is at 20,20,20. (I'll leave the three channels equal for simplicity, but of course they needn't be.) Now move the black point indicator to 20. That creates a new distribution of luminance in which the level 20,20,20 is mapped to 0,0,0, and the rest of the distribution is stretched accordingly. (The curves tool does a similar but more complex mapping, and I've always thought that the curves tool should display the new histogram on the Y axis.)
If you continue moving the black point indicator to the right, you clip. Mathematically, that is just censoring. Pixels can't have values lower than 0,0,0--no negative numbers in this case--so all of the pixels that would be lower than that are necessarily mapped to 0,0,0, and all information about their relative luminance is lost in the new distribution.
The black point doesn't refer to an individual pixel. In the start of this example, there was a black point, but no pixels mapped to it. At the end, when the distribution was censored, there were lots of pixels mapped to it.
Does this work?Last edited by DanK; 27th April 2016 at 12:08 PM.
-
27th April 2016, 01:31 PM #37
- Join Date
- May 2012
- Location
- northern Virginia suburb of Washington, DC
- Posts
- 19,064
Re: Limits of Exposure Composition
I don't know much about the capabilities of various software programs but I assume most if not all programs provide a separate display of the histogram that updates any time any edit is made. Being able to review a display of the prior histogram on the levels/curve tool while also being able to review the separate, updated histogram is very helpful. Originally Posted by DanK
-
27th April 2016, 02:16 PM #38
- Join Date
- Dec 2013
- Location
- Florida USA/Dunstable Beds.
- Posts
- 1,435
- Real Name
- Brian Grant
Re: Limits of Exposure Composition
Yes, that works and the black point may not be a specific pixel in an image but it is a pixel which has a value of 0,0,0. If no such pixel exists in a particular image you can use the black point to select the nearest you can find and assert it as black. If that pixel happens to be 0,20,0 it is converted to 0,0,0 and the green channel now has only 235 possible values which are interpolated across the range of 0-255. Red and Blue would be unchanged. Originally Posted by DanK
Using the assertion of a black or white pixel can change the color of an image.
-
27th April 2016, 10:01 PM #39
- Join Date
- Dec 2011
- Location
- New England
- Posts
- 8,631
- Real Name
- Dan
Re: Limits of Exposure Composition
Brian, Originally Posted by Saorsa
This is going way off the track of the OP, but I don't think this is correct. If I am wrong, hopefully someone who knows the math of photoshop will chime in. Yes, you can use the eyedropper tools to select pixels for setting the black and white points, and changing the black point can change colors. However, assuming you are using the default levels tool, then using the eyedropper is just using that location to select a luminance level. It does not tell photoshop to separately adjust that color channel. I just tested this by taking a landscape with a lot of blues (water) and greens (trees) and using the eyedropper to set a fairly aggressive black point, first using a blue pixel and then a green. I then turned on the histogram window and turned the levels adjustment layer on and off. You can see the three histograms for all the three color channels shifting sharply to the left when the adjustment is turned on. And the entire image darkens accordingly.
Dan
-
27th April 2016, 10:31 PM #40
- Join Date
- May 2011
- Location
- Brisbane Australia
- Posts
- 4,636
- Real Name
- Dave Ellis
Re: Limits of Exposure Composition
Dan I don't know the maths of PS either but one good way to see roughly what is happening is to set up a test image in PS with a few coloured rectangles. Apply a Levels adjustment layer and then on the Info tab for that layer, you can see the before and after RGB values for the location of the cursor. Try it with both the sliders and the eyedroppers.
Dave


 Reply With Quote