
I just read an article in Photoshop Creative on using Photoshop's HDR feature. I only have CS version 8 which doesn't feature the HDR stuff, so I can't check it myself, so please excuse me for asking...
If I shoot RAW and use the Adobe CameraRaw PlugIn to "process" the __same__ RAW file 5 times (at N-2, N-1, N, N+1, N+2) and merge the results in HDR, do I gain anything that can't be had by processing the RAW file carefully a single time?
I would be intrigued to people's thoughts.
 Helpful Posts: 0
Results 1 to 10 of 10
-
15th April 2008, 03:01 PM #1


- Join Date
- Apr 2008
- Posts
- 69
Processing a RAW file at multiple exposures
-
15th April 2008, 03:06 PM #2Administrator
- Join Date
- Apr 2008
- Location
- California, USA
- Posts
- 1,473
- Real Name
- Sean
Re: Processing a RAW file at multiple exposures
Processing the same RAW file several times (at different exposures) can indeed extract about another stop of dynamic range out of most SLR's, although the latest generation of RAW converters from Adobe, Capture One and others have gotten much better at extending the dynamic range of a single exposure.
The caveat with this technique is that color accuracy may suffer. This is the primary reason why most camera manufacturers do not include this extra dynamic range in the default in-camera JPEGs or RAW files at regular exposure. The amount of detail extracted and the accuracy of that resulting color also varies greatly depending on RAW converter software; fortunately Photoshop is very good at both of these.
Overall, developing several times may be ok, but any more than +1 stop will not give you any additional dynamic range. Further, due to concerns over color accuracy this is best used for monotonic light sources (near the sun or artificial light). Using this technique to recover skin tones and texture detail should be avoided if possible.
-
17th April 2008, 05:30 PM #3

- Join Date
- Apr 2008
- Location
- Philadelphia
- Posts
- 93
- Real Name
- Elie
Re: Processing a RAW file at multiple exposures
When I HAVE to increase the dynamic range of 1 RAW capture, I typically process the file into only -1, 0, and +1, and export them to 2 seperate 16 bit TIFs.
Depending on my goal, I might either process them in Photomatix for an exagerated look, or in photoshop for a more realistic look.
Now, keep in mind that you don't need "HDR" capability in PS to increase the dynamic range. I find that photo blending does an amzing job at increasing the dynamic range (sometimes).
Check out the technique (made from 2 exposures) but works well sometimes within 1 RAW shot.
http://www.luminous-landscape.com/tu...blending.shtml
Elie
-
18th April 2008, 03:06 AM #4Administrator
- Join Date
- Apr 2008
- Location
- California, USA
- Posts
- 1,473
- Real Name
- Sean
Re: Processing a RAW file at multiple exposures
Thanks for the link. For me, it ultimately comes down to how the dynamic range is distributed. The link you provided works very well for situations where the bright/dark layers are highly intertwined or intersect with an unusual geometry. It uses something called "contrast masking". Although that article referred to a plugin from FredMiranda, contrast masking can also be easily performed manually. I will put up a tutorials page on this, here's a quick overview of the steps in the meantime:
(1) Start with two images, each at a different exposure. The difference in exposure should be set so that the dark areas are properly exposed in the higher exposure version, and the light areas are properly exposed in the other lower exposure version.
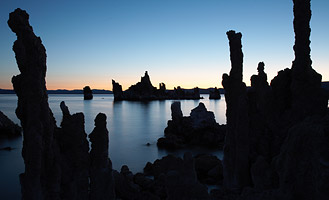
(2) In photoshop, layer the darker exposure on top of the lighter one.
(3) Create a layer mask for the top layer.
(4) Copy the brighter image, then paste it into the layer mask for the top layer.
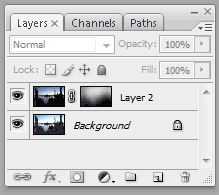
(5) Apply a gaussian blur to the layer mask with a blur radius that serves to increase local contrast, while also not making halo artifacts too visible. It helps to have the final image showing as you adjust the radius so you can quickly see the impact of blur radius. For most full size 8MP images this is somewhere between 50-250 pixels. Your layers in Photoshop should not look as follows:
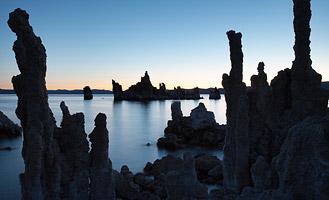
(6) You're done! Just flatten the image:
The biggest disadvantage to this process though is the halo artifacts. These are more and more difficult to avoid as the difference between the dark and light exposure increases.
Overall this is the rough equivalent of using a graduated neutral density (GND) filter whose shape has been customized to best suit your photo. With film, some photographers would use a combination of linear and circular or other odd-shaped GNDs to get a similar, although inferior, result.Last edited by McQ; 18th April 2008 at 03:27 AM.
-
18th April 2008, 03:11 AM #5
- Join Date
- Apr 2008
- Location
- Philadelphia
- Posts
- 93
- Real Name
- Elie
Re: Processing a RAW file at multiple exposures
Awesome. I never understood the reason for the blur until now, after I read the unsharp mask and local contrast tuts. Thanks.
-
18th April 2008, 03:15 AM #6Administrator
- Join Date
- Apr 2008
- Location
- California, USA
- Posts
- 1,473
- Real Name
- Sean
Re: Processing a RAW file at multiple exposures
On the other hand, when the dark and light layers are not intertwined, I really prefer the look of a regular linear GND. It is important to always be cognizant of the trade-off between dynamic range and contrast--increasing one will inevitably reduce the other. In most images, too low of a contrast can reduce the "pop" and clarity, making it look washed out. GNDs are great because they can increase overall dynamic range, while also maintaining local contrast.
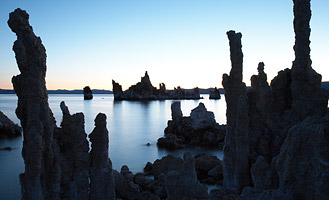
This only works for very particular light distributions though. If the light/dark layers are intertwined, it can produce visible darkening of the tips of objects that protrude into the light area of the image. The example below is for the same image as the previous post, except this time using the GND effect:
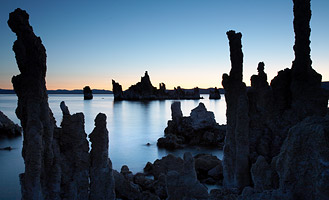
Notice how the tips of the tufa towers are visibly very dark compared to the contrast masking technique. It really just depends on your subject matter.
Only when the difference between light and dark layers is *really* extreme do I prefer the look of using Photoshop CS2/CS3's HDR technique.
-
25th April 2008, 09:10 PM #7New Member
- Join Date
- Apr 2008
- Location
- Montreal Canada
- Posts
- 8
Re: Processing a RAW file at multiple exposures
I use a technique that is viewable at http://www.russellbrown.com/tips_tech.html called place-a matic.
It requires the use of photoshop. The video at Mr Brown's website is self-explanatory. You process the same image twice, once for the hightlights and once for the shadows. You then use a mask layer with either white or black paint with a soft brush at around 10% opacity to reveal or hide the areas you want to show from either the dark or the light version of the image. There is quite a lot of other interesting information on his website.
-
25th April 2008, 09:23 PM #8
- Join Date
- Apr 2008
- Location
- Philadelphia
- Posts
- 93
- Real Name
- Elie
Re: Processing a RAW file at multiple exposures
Thanks for the link. It is a good website.
This is a good technique, I personally find 2 things anooying about it.
1) The time involved. It takes quite a bit painting masks accurately.
2) Noise that results when extracting details from darks areas (typically happens when brightening a RAW image).
I would be interested to see what other people's experiences are with such techniques.
Thanks,
Elie
-
4th May 2008, 02:19 PM #9
- Join Date
- May 2008
- Location
- Madrid (Spain)
- Posts
- 169
Re: Processing a RAW file at multiple exposures
I have to disagree a bit with the belief commented here that several developments at different exposure values in the RAW developer can increase the final DR captured. If __just one__ properly development is done, there will be no extra information in blending different developments of the same RAW file. To do so, may do easier the task to enjoy the captured DR, but ALL the information is in the RAW so one proper development would be enough to recue all of it.
And what is a 'proper development'? a development using a white balance with <1 multipliers. This is achieved in ACR for instance by adjusting a negative Exposure correction value (-1,5EV should be a good start point). In DCRAW for instance you just have to develop your RAW file with the -H 2 option (or -H 3-9 for active highlight recovery) to recover all the DR present in the RAW file.
BR
-
4th May 2008, 05:10 PM #10Administrator
- Join Date
- Apr 2008
- Location
- California, USA
- Posts
- 1,473
- Real Name
- Sean
Re: Processing a RAW file at multiple exposures
This technique is not really intended to extend total dynamic range-- just to make the available dynamic range more visible while also preserving image contrast. It's really an advanced shadow/highlight recovery with better recover and less posterization.
That being said, photography is all about perception; if a photo becomes more tonally rich in appearance, but strictly speaking contains the same numbers in the RAW file...it doesn't really mather whether there was a true DR extension or not. The above shots used in the examples had plenty of dynamic range in a single RAW file-- the problem was how to best utilize it.
I do agree that two separate exposures still would have improved the results because noise would be lower in the shadows. However, for many shots (excluding those used as examples) this is not always possible or not worth the extra time/complication when image noise is not a problem.

 Reply With Quote