
 Helpful Posts:
 Just some mild colour balancing in ACR
Then Deconvolution sharpening with Topaz Infocus, image selection and contrast sharpening with Topaz Detail 3, cloning on a foot, brightness on the foot, colour change on a foot, perspective adjustments and resizing using the Mitchell process to A3 @300dpi with Helicon Filter Pro all 16 bit, until I use Photoshop Elements 10 and Topaz Remask 3 to add a little gradient blur.
Was it worth three hours work?
Results 1 to 18 of 18
Thread: Bedfore and After processing
-
2nd September 2013, 02:14 PM #1


- Join Date
- Sep 2009
- Location
- Burton on Trent, UK
- Posts
- 4,788
- Real Name
- Steve
Bedfore and After processing
-
2nd September 2013, 02:41 PM #2
- Join Date
- May 2011
- Location
- SE Michigan
- Posts
- 4,511
- Real Name
- wm c boyer
Re: Bedfore and After processing
A couple of caveats...I only do Photoshop without plug-ins and often take three hours or so.
Having said that, I don't see three hours of work on this image...especially relating to the detail work.
But, I've always believed that evaluating image quality from the web is an exercise in abject futility...
the fine detail can never be perceived from that image shown on the web.
-
2nd September 2013, 03:06 PM #3

- Join Date
- Dec 2009
- Location
- WNY
- Posts
- 36,717
- Real Name
- John
Re: Bedfore and After processing
Which process took the longest and was the ultimate goal (particularly the resizing) to make a print? Do you think the gradient blur was enough?
Nice image.
-
2nd September 2013, 03:38 PM #4
- Join Date
- Sep 2009
- Location
- Burton on Trent, UK
- Posts
- 4,788
- Real Name
- Steve
Re: Bedfore and After processing
Cheers Chauncey.
 John I had a problem with the blown area on the foot and tried several methods from just burning, change colour but found that cloning with change of colour and selective brightness was best although it was hard to pick hair in the general direction, but most time was spent selecting hair using ReMask so I would be able to extract the horse, difficult because some of the hair is on similar coloured background, and because I'm not an expert.
So I touched up in PSE10 using a mask for the gradient but also choosing to blur the tail slightly and an eraser to remove tiny faults.
It was done for a print to A4 size although I normally do A3+ prints I'm saving money. cheers
-
6th September 2013, 02:09 AM #5
- Join Date
- Nov 2011
- Location
- Tulsa, OK
- Posts
- 468
- Real Name
- Larry Saideman
Re: Bedfore and After processing
For me, I think the background is a problem for this pic. Even blurred, the fence and vehicle behind detract from the horse. I find myself always wondering is a particular image worth any time at all or a lot of time or anywhere in between. It is always got to be a balance that only each of us can determine. I spend a lot more time than I ever thought I would on my images but three hours is way beyond my current max. In this case, the final result was worth it for you. I would probably have felt differently and stopped earlier.
-
6th September 2013, 10:17 AM #6
- Join Date
- Sep 2009
- Location
- Burton on Trent, UK
- Posts
- 4,788
- Real Name
- Steve
Re: Bedfore and After processing
Indeed it lives in a factory or more accurately a brewery and it was a sort of open day. Unfortunately the only view without fencing, trucks or fairground was taken inside the horses exercise area where the public isn't allowed and this horse likes me too much.
It is more than 3 hours now since after I printed and waited 24 hours for the ink to settle I decided it was too red, and so I made the chippings slightly more grey and printed again.
The main thing was the foot, I've printed others years ago but this one had a blown foot and I wondered if I could fix it or does it make any difference, as for the DOF it took about 90 mins and is greater than the camera can achieve because 100mm @f4 on a crop camera is pretty near the minimum my lens can achieve and I just are not used to zooming. Cheers Larry.
-
8th September 2013, 05:19 AM #7
- Join Date
- Feb 2012
- Location
- Texas
- Posts
- 6,956
- Real Name
- Ted
Re: Bedfore and After processing
Yes. Only three hours? I've got probably tens or even hundreds into a sunflower shot with gamut problems Originally Posted by arith
")
De-convolution sharpening can be quite startling, I've found.
LOL Originally Posted by chauncey

.
-
8th September 2013, 01:01 PM #8
- Join Date
- Sep 2009
- Location
- Burton on Trent, UK
- Posts
- 4,788
- Real Name
- Steve
Re: Bedfore and After processing
Cheers Ted, De-convolution sometimes works but it also sometimes introduces artefacts difficult to see until after printing. I wish that digital could be like film and the only sharpening done is in camera.
Wonder what medium format is like? Too expensive to try.


-
8th September 2013, 11:21 PM #9
- Join Date
- Oct 2011
- Location
- Grand Cayman, GT
- Posts
- 830
- Real Name
- Graham Heron
Re: Bedfore and After processing
.... and until you yourself apply it, that's exactly what you get. Originally Posted by arith
Unless you are suggesting that as an imposition for everyone?
Graham
-
9th September 2013, 07:48 AM #10
- Join Date
- Sep 2009
- Location
- Burton on Trent, UK
- Posts
- 4,788
- Real Name
- Steve
Re: Bedfore and After processing
Contrast sharpening isn't the same kind of sharpening as you get in film Graham. It is a long time since I used film and even longer since I processed a film and used an enlarger but I thought the only way to get an even sharper image was to use a dilution of chemicals or a better lens.
That is why I bought a De-convolution program, to try and get a natural look, which sometimes works and sometimes doesn't.
I didn't notice this fault until I printed and thought, is that right, and had a look at the raw file.


The light is supposed to be smooth and you can see an echo effect, even printing A3 is tiny and hard to see but it still looks better when it is done right.
-
9th September 2013, 09:11 AM #11
- Join Date
- Apr 2012
- Location
- Dunedin New Zealand
- Posts
- 2,697
- Real Name
- J stands for John
Re: Bedfore and After processing
I can see why it took you three hours and for the precise detail you have achieved in the hoof hair which was blown orioginally I think you did well. I would suggest a little more time using a quite simple process of duplicatng what you have and extending the grey iron wall to cover the truck and fence and then erasing it where the horse is. Took me half an hour to do that but to get the detail of hoof hair easilly could take the otheer 2.5 hours with experimentation.
This perhaps answers the crit of what you had ... what you might choose to do in a further quarter or half hour having done the hard yack already.

EDIT ... forgot to mention one blurrs the top layer to required degree and I also use the blurr tool [ like a paint brush] on the sand behind the horse. I use PSP and worked from your original and first step was to adjust using curves as an adjustment layer. Don't know if PSE has comparable tooldsLast edited by jcuknz; 9th September 2013 at 09:25 AM.
-
9th September 2013, 01:25 PM #12
- Join Date
- Sep 2009
- Location
- Burton on Trent, UK
- Posts
- 4,788
- Real Name
- Steve
Re: Bedfore and After processing
Cheers J Originally Posted by jcuknz
I'm doing an 'In and Around Burton' portfolio of prints and it is important to be able to recognise the place. I already have an image with the background masked out but the different colours were bleeding and desaturated didn't look right. I just stick to simple stuff now although ReMask has potential if you shoot in a studio with a plain green background.
Last edited by arith; 9th September 2013 at 02:19 PM.
-
9th September 2013, 02:37 PM #13
- Join Date
- Feb 2012
- Location
- Texas
- Posts
- 6,956
- Real Name
- Ted
Re: Bedfore and After processing
As I understand the theory of deconvolution, it applies the opposite of "sinc" function as found in Airy Disks where the brightness is a wave decaying from the center of the disk. So, I imagine that if deconvolution is applied to a soft edge that is too soft for another reason then those "echos" or multiple halos are like to appear - quite severely as on that train lamp. Originally Posted by arith
Therefore one could proceed by first trying deconvolution but, if echos appear no matter what combo of deconv settings you try, undo it and try your favorite other sharpener, e.g. USM instead.
Or maybe in a recalcitrant image there is a combination of blurring mechanisms where a little deconv followed by a little USM might do it.
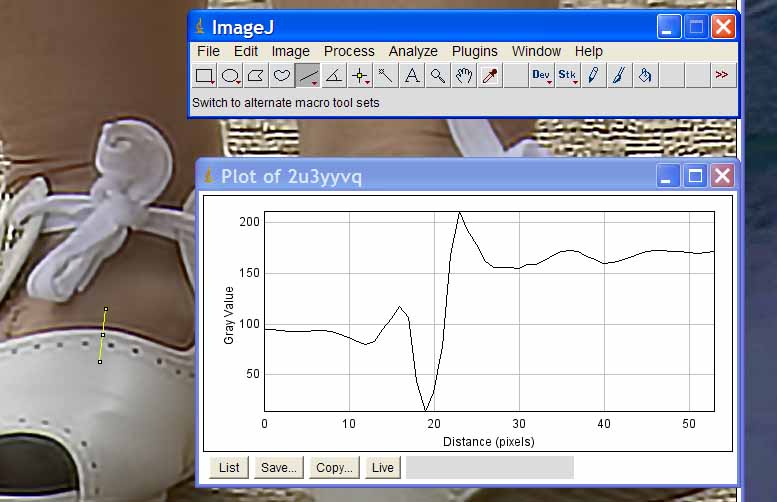
You might want to download ImageJ (free) which lets you draw a line (below left) through a part of an image and then show a profile of the luminosity along the line. Not for the faint of heart and definitely not those who like to play the "real world" card
Last edited by xpatUSA; 9th September 2013 at 09:28 PM.
-
10th September 2013, 09:33 AM #14
- Join Date
- Sep 2009
- Location
- Burton on Trent, UK
- Posts
- 4,788
- Real Name
- Steve
Re: Bedfore and After processing
 I just had to look sinc up since I took pure mathematics and was unfamiliar with it, and it is a damped sine with removable discontinuity at 0 but do you mean by take the opposite, undamping.
Can't even remember what a function of a complex variable is now and didn't expect to meet one in here, surprising just how complicated some things are that use just a couple of sliders.
Cheers Ted.
-
11th September 2013, 02:35 PM #15
- Join Date
- Feb 2012
- Location
- Texas
- Posts
- 6,956
- Real Name
- Ted
Re: Bedfore and After processing
Not really, perhaps I over-simplified. De-convolution tries to do what it says - to undo the effect of convolution, which we see as soft edges. Originally Posted by arith
Among other things, the process of iteration is involved which essentially means to keep trying the same algorithm until the the result is good enough. For example, we can find a square root by such a process. You guess at a square root and see if you got it right. You take another quess, etc, etc. In the Richardson-Lucy (RL) de-convolution method, you set the number of tries (in RawTherapee anyway) by a slider but you have to examine the final result yourself. In RawTherapee, I've read that a Gaussian function is used which is not perfectly correct but owt's better than nowt, lad.
When you set the width in pixels you yourself are guessing at the 'blur width' (not a precise phrase but it will do). Too much, and halo(s) will appear. Setting the amount is self-evident.
In theory, if the scene has a perfect edge in it (aligned perfectly vertical or horizontal) RL deconvolution can reconstitute a perfect edge in your image. Yup.
Here's some links from respected folks:
http://www.fredmiranda.com/forum/topic/848581
http://www.luminous-landscape.com/fo...?topic=45038.0
http://www.clarkvision.com/articles/...on1/index.html
The last link has some hair in it . . .
I've read on LL that Adobe Camera Raw starts to apply de-convolution as the 'detail' slider is increased.
My mathematical knowledge is at least as bad as yours but, now we have the web, it's not necessary to remember anything - perfect at my age
OT: they still have a Burton Ales brewery?Last edited by xpatUSA; 11th September 2013 at 02:52 PM. Reason: added a hairy link
-
12th September 2013, 08:43 AM #16
- Join Date
- Sep 2009
- Location
- Burton on Trent, UK
- Posts
- 4,788
- Real Name
- Steve
Re: Bedfore and After processing
Cheers Ted, I like the way you can use both methods. There is lots of Brewery's here but I think Burton Ales is taken over by Coors. Marstons is taken over by Banks, but their is a Burton Bridge Brewery.
Some of the old buildings still exist and I was once locked into Marstons one night, I delivered some beer and decided to have a break in a quiet corner, but on my way out I found everybody had gone home locking me in.
-
12th September 2013, 09:19 AM #17

- Join Date
- Sep 2012
- Location
- Nomadic but not homeless, ex N.Z. now Aust.
- Posts
- 4,140
- Real Name
- Paul

Re: Bedfore and After processing
Steve I now try and avoid burnt out highlights like the plague but when I do need to recover by cloning (typically hair or waterfalls etc) I set the blend mode to darken and sample from the most equivalent source that is retaining a bit of detail.
-
12th September 2013, 01:19 PM #18
- Join Date
- Sep 2009
- Location
- Burton on Trent, UK
- Posts
- 4,788
- Real Name
- Steve
Re: Bedfore and After processing
Cheers L
He was a bit quick and I suppose when I see white on a sunny day I should try to centre the exposure rather than bang it up to the right. I set the lens on 100mm and expected him to run into frame, once he started to move I started to take shots but he was too quick and on top of me in a second.
If only I could learn to zoom.


 Reply With Quote