DIGITAL CAMERA DIFFRACTION, PART 2
The exact value of the diffraction-limited aperture is often a contentious topic amongst photographers. Some might claim it's at f/11 for a given digital camera, while others will insist that it's closer to f/16, for example. While the precise f-stop doesn't really matter, it's good to clarify why there's so many opinions, and how these differences might translate into how your photograph actually appears. This article is intended as an addendum to the earlier tutorial on diffraction in photography.
CAMERA SENSOR RESOLUTION
Knowing the diffraction limit requires knowing how much detail a camera could resolve under ideal circumstances. With a perfect sensor, this would simply correlate with the size of the camera sensor's pixels. However, real-world sensors are a bit more complicated.
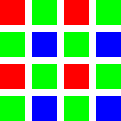
Bayer Color Filter Arrays. Most of today's digital cameras only capture one of the primary colors at each pixel: green, red or blue (as depicted to the left). Furthermore, the color array or "mosaic" is arranged so that green is captured at twice as many pixel locations than is red or blue. Using sophisticated demosaicing algorithms, full color information at each pixel is then estimated based on the values of adjacent pixels.
Anti-Aliasing Filter & Microlenses. In front of the color filter array, most camera sensors also have another layer of material which aims to (i) minimize digital artifacts, such as aliasing and moiré, and to (ii) improve light-gathering ability. While this can further reduce resolution, with recent digital cameras resolution isn't too severely impacted (compared to what's already lost from the color filter array).
The end result is that the camera's resolution is better than one would expect if each 2x2 block containing all three colors represented a pixel, but not quite as good as each individual pixel. The exact resolution is really a matter of definition.
RESOLUTION DEFINITIONS
If it's not simply the pixel size, how does one define the resolution of a digital camera? Resolution is usually measured by taking a photo of progressively more closely spaced parallel lines. Once these lines can no longer be distinguished, the camera's resolution is said to have been surpassed. However, as with most things, it's not quite so clear cut.

For the purpose of this tutorial, two resolution definitions are relevant:
Extinction Resolution. This describes the smallest features or edges that can be captured by your camera, although such detail may not necessarily be distinguished if it's too closely spaced, and such detail may also exhibit noticeable demosaicing artifacts. Beyond this resolution, progressively finer detail will appear almost completely smooth. In the above diagram, the extinction resolution will be near (or just beyond) the far right edge.
Artifact-Free Resolution. This describes the most closely spaced details which are still clearly distinguished from one another. Beyond this resolution, detail may exhibit visible demosaicing artifacts, and may not be depicted in the same way it appears in-person. The artifact-free resolution is typically what one is referring to when they speak of the resolution limit. In the above diagram, the resolution limit would be past roughly the first two-thirds of the image.
One could make the argument that any detail finer than the artifact-free resolution limit isn't actually "real detail," and therefore shouldn't matter, since it's largely the result of the bayer array and digital artifacts. However, one could also argue that such features do indeed improve apparent image detail, which is often helpful with objects such as fine leaves or grass. Edges will also appear more sharp and defined.
Technical Notes:
The real-world resolution limit of a Bayer array is typically around 1.5X as large as the individual pixels. For example, Canon's EOS 5D camera has 2912 vertical pixels, but can only resolve ~2000 horizontal lines. However, its extinction resolution is around ~2500 horizontal lines, so details as fine as 1.2-1.3X the pixel size may also appear. While these values will vary slightly based on the camera and RAW converter, they're a good rough estimate that's based on actual measurements.
DIGITAL CAMERAS: COLOR vs. LUMINOSITY DETAIL
Our human visual system has adapted to be most sensitive to the green region of the light spectrum (since this is where our sun emits the most light — see the tutorial on human color perception). The result is that green light contributes much more to our perception of luminance, and is also why color filter arrays are designed to capture twice as much green light as either of the other two colors.
However, this human sensory trick isn't without trade-offs. It also means that color filter arrays can resolve differences in lightness far better than differences in color — with important implications for the diffraction limit. Since the resolution of green/lightness is roughly twice as high as that for red or blue, a higher f-stop is required before diffraction begins to limit the resolution of strictly red/blue details.
| ← Less Diffraction | More Diffraction → |
Finally, regardless of the type of camera sensor, diffraction doesn't affect all colors equally. The longer its wavelength, the more diffraction will scatter a given color of light. In the visual rainbow — red-orange-yellow-green-blue-indigo-violet — the red end of the spectrum has the longest wavelength, and the wavelength gets progressively shorter as one moves toward the violet end of the spectrum. So why is this relevant? With camera color filters, blue light is much less susceptible to diffraction than red light, so it requires a higher f-stop before diffraction begins to limit its resolution.
AIRY DISK OVERLAP & MICRO-CONTRAST
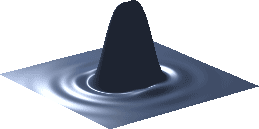
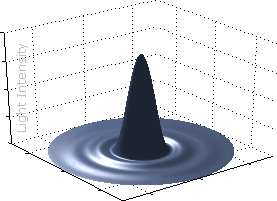
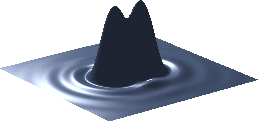
The resolution limit of any optical system can be described based on how finely it's able to record a point light source. The shape at which this point light source is recorded is called the "airy disk." The width of an airy disk is controlled by the camera's f-stop; if this width increases too much, closely spaced points may no longer be resolved (as shown below).
 |
 |
|
| Airy Disk (smallest point light source) |
Closely Spaced Points | |
|---|---|---|
| Barely Resolved | Unresolved | |
At low f-stop values, the width of this airy disk is typically much smaller than the width of a camera pixel, so your pixel size is all that determines the camera's maximum resolution. However, at high f-stop values, the width of this airy disk can surpass* that of your camera's pixels — in which case your camera's resolution is said to be "diffraction limited." Under such a scenario, the resolution of your camera is determined only by the width of this airy disk, and this resolution will always be less than the pixel resolution.
The key here is that airy disks begin overlapping even before they become unresolved, so diffraction will become visible (and potentially erase subtle tonal variations) even before standard black and white lines are no longer distinguishable. In other words, the diffraction limit isn't an all or nothing image quality cliff — its onset is gradual.
*Technical Note: Strictly speaking, the width of the airy disk needs to be at least ~3X the pixel width in order for diffraction to limit artifact-free, grayscale resolution on a Bayer sensor, although it will likely still become visible when the airy disk width is near 2X the pixel width.
ADVANCED DIFFRACTION CALCULATOR
Use the following calculator to estimate when diffraction begins to influence an image. This only applies for images viewed on-screen at 100%; whether this will be apparent in the final print also depends on viewing distance and print size. To calculate this as well, please visit: diffraction limits and photography.
Most will find that the f-stop given in the "diffraction limits extinction resolution" field tends to correlate well with the f-stop values where one first starts to see fine detail being softened. All other pages of this website therefore use this as the criterion for determining the diffraction-limited aperture.
The purpose of the above calculator isn't so that you can scrutinize your images to see when blue details are impacted, for example. Instead, it's intended to do the opposite: to give an idea of how gradual and broad diffraction's onset can be, and how its "limit" depends on what you're using as the image quality criterion.
CONCLUSIONS
Thus far, you're probably thinking, "diffraction more easily limits resolution as the number of camera megapixels increases, so more megapixels must be bad, right?" No — at least not as far as diffraction is concerned. Having more megapixels just provides more flexibility. Whenever your subject matter doesn't require a high f-stop, you have the ability to make a larger print, or to crop the image more aggressively. Alternatively, a 20MP camera that requires an f-stop beyond its diffraction limit could always downsize its image to produce the equivalent from a 10MP camera that uses the same f-stop (but isn't yet diffraction limited).
Regardless, the onset of diffraction is gradual, and its limiting f-stop shouldn't be treated as unsurpassable. Diffraction is just something to be aware of when choosing your exposure settings, similar to how one would balance other trade-offs such as noise (ISO) vs shutter speed. While calculations can be a helpful at-home guide, the best way to identify the optimal trade-off is to experiment — using your particular lens and subject.
For more background reading on this topic, also visit:
Understanding Diffraction, Part 1: Pixel Size, Aperture & Airy Disks
